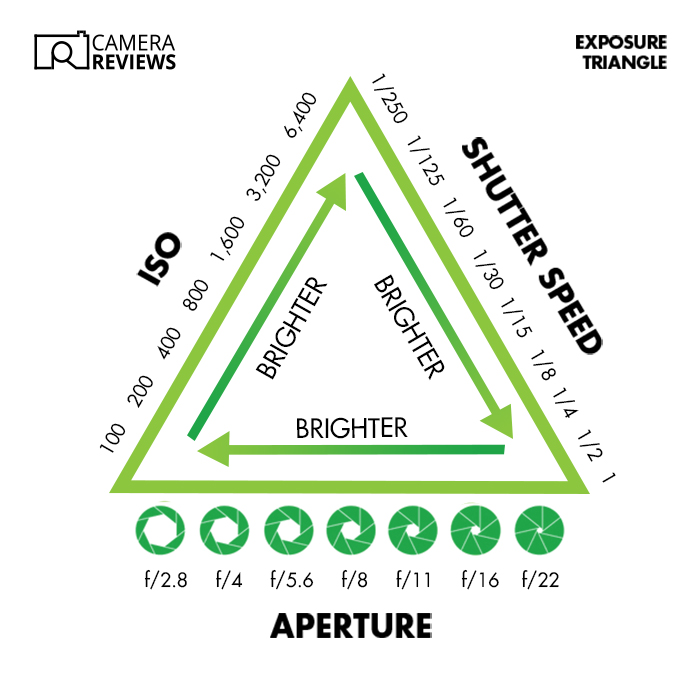
Three of the most important terms in photography are aperture, shutter speed, ISO. They’re also known as the “Exposure Triangle” because they help you get the right exposure (or brightness) for your images.
But let’s go into a bit more detail. Why is exposure important? How do we control it? What do all the different settings actually do? Here’s a quick guide with all you need to know about aperture, shutter speed, and ISO.
The Exposure Triangle is just a way to explain the relationship between shutter speed, aperture, and ISO. These camera settings control the exposure.
And they often are illustrated as a triangle because triangles have three corners and three sides. That’s all.
Exposure is important because you don’t want your pictures to be too dark or bright. And it depends on what you’re shooting.
If you’re photographing the night sky, it’ll be much darker than a sunny day. But you still don’t want it to be too dark to see the stars or too bright to show it’s at night.
It’s the relative brightness that matters. It’s the image’s brightness relative to the real world—or perhaps the image you have in mind.
So how do you know if images will be too dark or bright? And how do you control the brightness?
Well, every modern camera has a light meter built into it. It looks at the scene and makes an educated guess about how bright the image should be.
The camera doesn’t “know” what’s in front of it. But manufacturers program the light meter assuming the world reflects 18% of the light that falls on it.
If the camera thinks the exposure will be more than that, it assumes it’ll be overexposed. If it’s going to be less than that, it assumes it’ll be underexposed.
Some cameras, like point-and-shoots (compacts), don’t show the light meter. They automatically adjust the shutter speed, aperture, and ISO to give you a “correctly exposed image.”
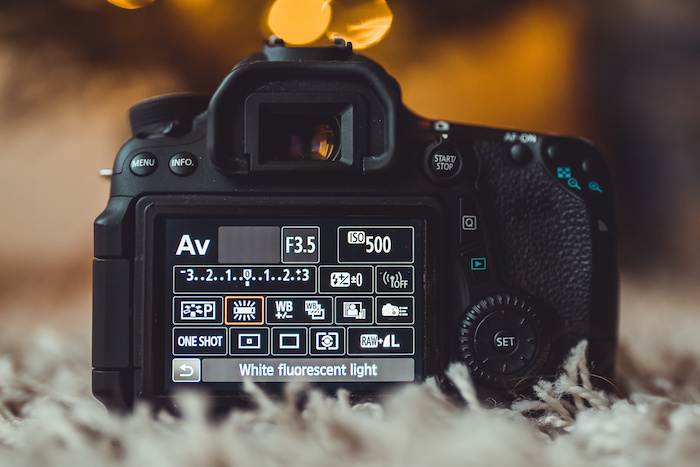
Other cameras give you a choice. They show you the light meter reading and let you take a picture with the automatic camera settings or choose different ones.
The light meter reading is usually on a scale with zero as the “correct” exposure. And anything negative is too dark, and anything positive is too bright.
The units shown are called “stops.” And a stop is just a doubling or halving of the brightness.
If the light meter gives a reading of +1, the image will get twice as much light as it needs for the correct exposure. That will lead to the image being overexposed by one stop.
The same is true in reverse. If the meter says -1, the image will be underexposed by one stop.
There are three ways to change exposure. You can alter the aperture, shutter speed, or the ISO. So let’s look at each of those in more detail.
Aperture means “hole.” And the aperture of a lens is the hole through which the light passes.
These days, the aperture is formed by a diaphragm. This group of 7 to 11 metal “leaves” or “blades” open and close to make a larger or smaller aperture.
Unlike the shutter speed, a camera’s aperture doesn’t have a nice, easy scale. Instead, you get weird numbers like f/5.6 and f/7.1.
It can be confusing. And it’s because of the way the aperture value is calculated.
Strictly speaking, it’s the focal length divided by the diameter of the “entrance pupil.” (This means the size of the hole in the diaphragm when you look through the front of the lens.)
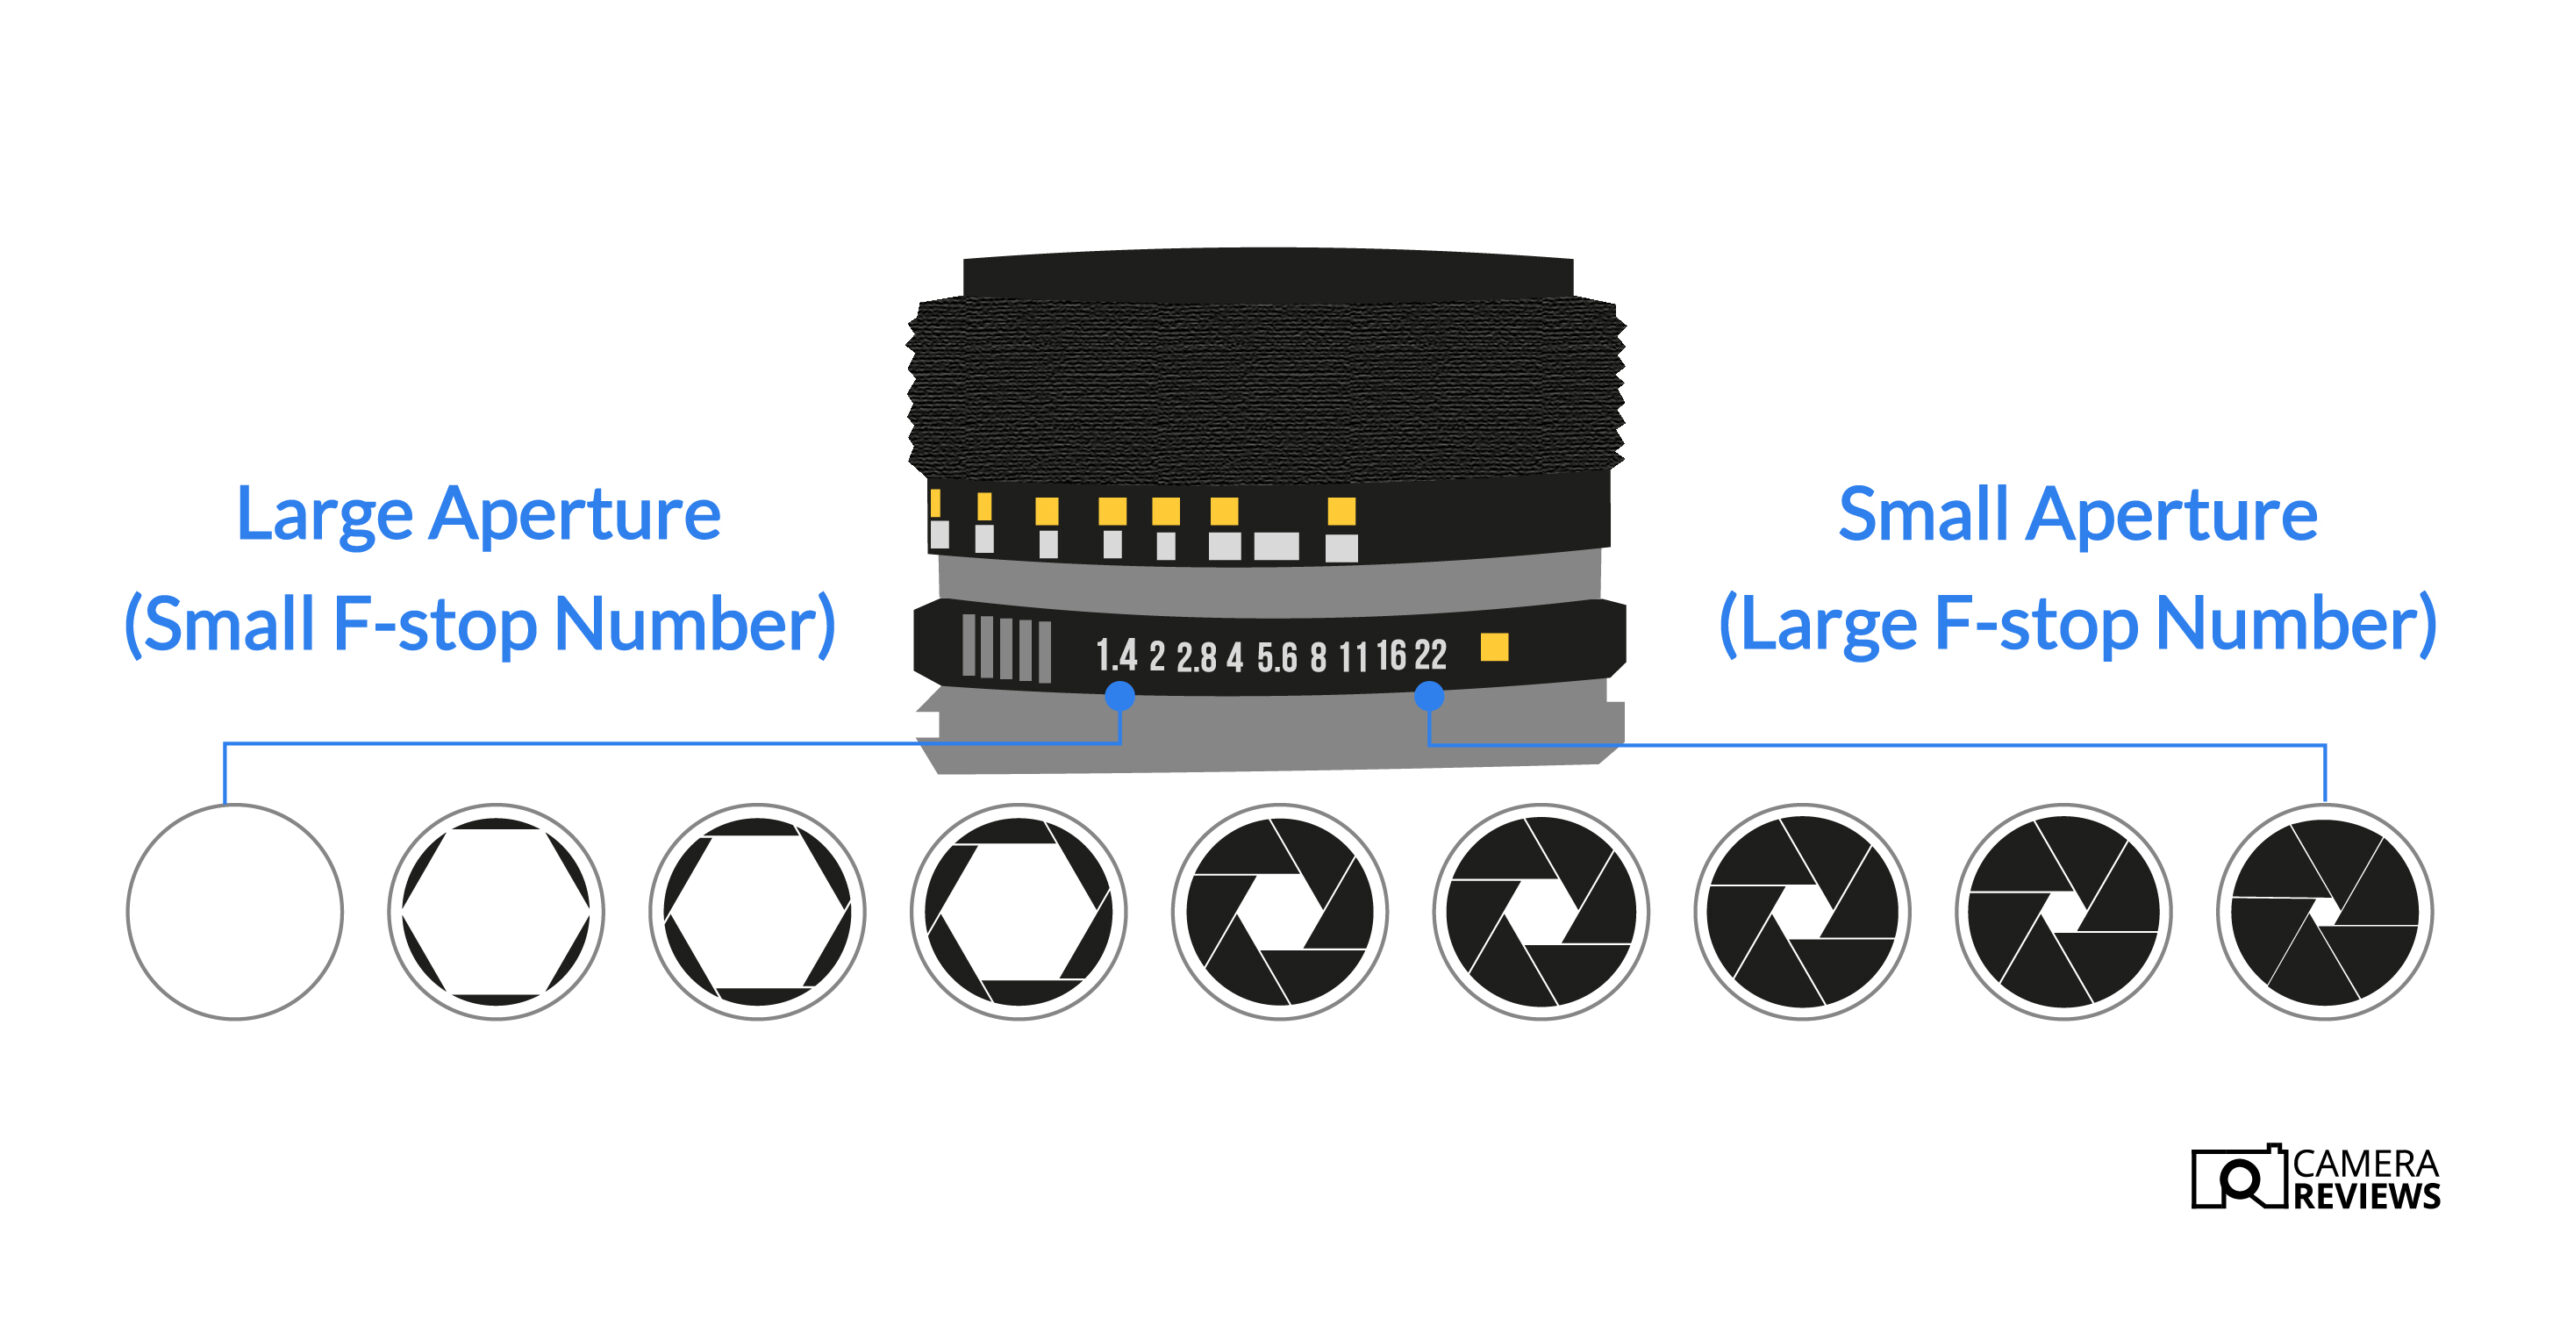
The standard aperture sequence is f/1, f/1.4, f/2, f/2.8, f/4, f/5.6, f/8, f/11, f/16, f/22, etc. The “f” stands for “focal.” And the backslash (/) is optional.
Each value is the f-number (or f-stop). The sequence isn’t consistent. But if you look carefully, you’ll see that each interval of two stops involves doubling (or halving) the f-number.
That means adding two stops to f/2 gives you f/4. And taking away two stops from f/16 gives you f/8.
The sequence gets even more complicated when you add in fractions of stops. Hence, you might have a lens with a maximum aperture of f/3.5 or some other weird value.
Normally, f-numbers, shutter speeds, and ISOs are measured in whole stops. But most modern DSLRs and mirrorless cameras let you pick a scale measured in halves or thirds of a stop. (See our handy f-stop chart for reference!).
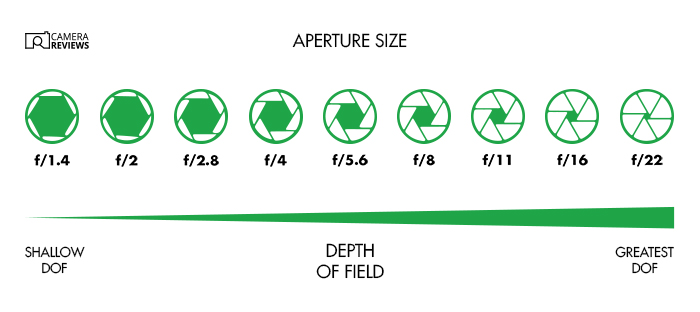
The aperture is important because it helps control your image’s depth of field. (Along with the distance from your subject and the focal length of your lens.)
Depth of field is the distance from front to back that appears “acceptably sharp.”
Lenses focus light at a single point. So objects only appear pin-sharp if they’re at the right distance from the camera. But if they’re a little nearer or further away, our eyes won’t notice.
Shutter speed is not a “speed” at all. It’s actually the time that the digital camera sensor (or film) is exposed to light coming through the lens.
Most people still call it the shutter speed. But Canon users call it the “time value” (Tv), which is more accurate but sounds a bit weird!
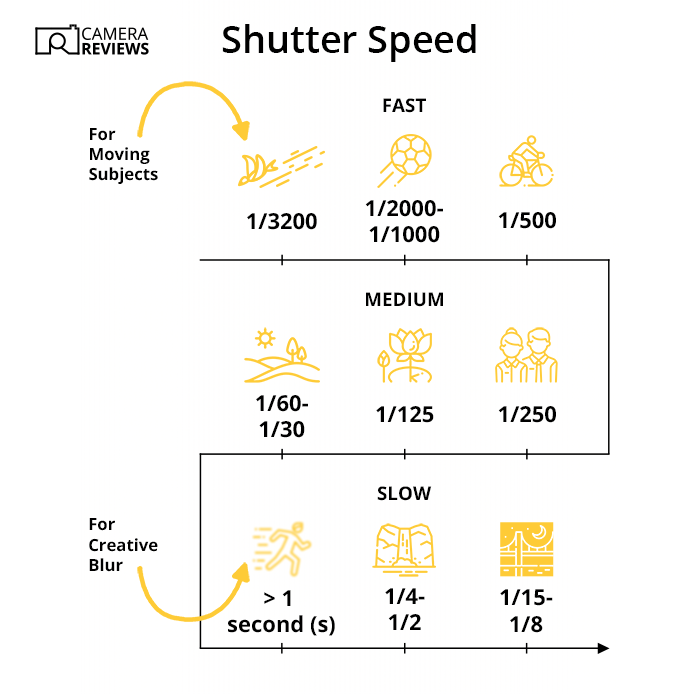
Shutter speeds are measured in seconds (s) or fractions of a second. Most mirrorless or DSLRs give you the choice of a fast shutter speed of around 1/32,000 s all the way to 30 seconds.
You can even shoot in Bulb mode (B) to manually open and close the shutter. This lets you choose any length of exposure, which is useful if you’re using a tripod at night.
The shutter speeds are rounded at certain points to make the numbers easier. That means the sequence doesn’t go from 1/60 to 1/120 s but from 1/60 to 1/125 s, say.
The normal sequence is 1, 1/2, 1/4, 1/8, 1/15, 1/30, 1/60, 1/125, 1/250, 1/500, 1/1000, 1/2000, 1/4000, 1/8000, 1/16000, 1/32000 s, etc.
But other shutter speeds are possible, like 1/6400 s. They just aren’t in the main sequence.
To save space, the shutter speeds don’t appear as fractions in the viewfinder or on the LCD screen. That means “250” means 1/250 s rather than 250 seconds!
The numbers of seconds are shown with quotation marks (“) after them to avoid confusion. And the shutter speed is directly related to the amount of light that falls on the film or sensor.
This means an image taken at 1/1000 s will be twice as bright as one taken at 1/2000 s… unless you change the aperture or ISO to compensate.
The shutter speed is one of the most important creative controls because it decides the amount of motion blur in your images.
Most people want images to be sharp. So a fast shutter speed is appropriate. But action shots can often look better with a bit of motion blur, which means using a slow shutter speed.
You need to decide how much you need. And then, you need to know how to control it using fast or slow shutter speeds.
The right shutter speed depends on the speed of your subject and how steady your hands are. A person walking can be “frozen” at 1/250 s. But a Formula 1 race car might need 1/1000 s.
Also, camera shake can cause blur—especially if you shoot handheld. But cameras and lenses now have sophisticated image stabilization systems to help curb this.
But nobody can hold a camera absolutely still for long periods (like 30 seconds)! So it’s best to use a tripod in those cases. Otherwise, you need to find what works based on several factors.
This includes how many stops of stabilization you get from your camera, how long your lens is, and how steady your hands are.
ISO is the sensitivity of the film or camera sensor. The letters in “ISO” don’t stand for anything.
The International Organization for Standardization wanted a general abbreviation. It chose ISO because it’s derived from the Greek word isos, meaning “equal.”
Like the shutter speed scale and unlike the aperture scale, ISO values change predictably. The sequence is ISO 100, 200, 400, 800, 1,600, 3,200, 6,400, etc. (But there are some variations.)
Some people write the ISO after the number, and some before. And some people pronounce ISO as a word (“eye-so”) rather than an abbreviation. But it doesn’t matter which you prefer.
The ISO value represents the sensitivity of the film or camera sensor. So the higher the ISO number, the more sensitive it is.
Hence, a picture taken at 200 ISO will be twice as bright as one taken at 100 ISO. (All other things being equal.)
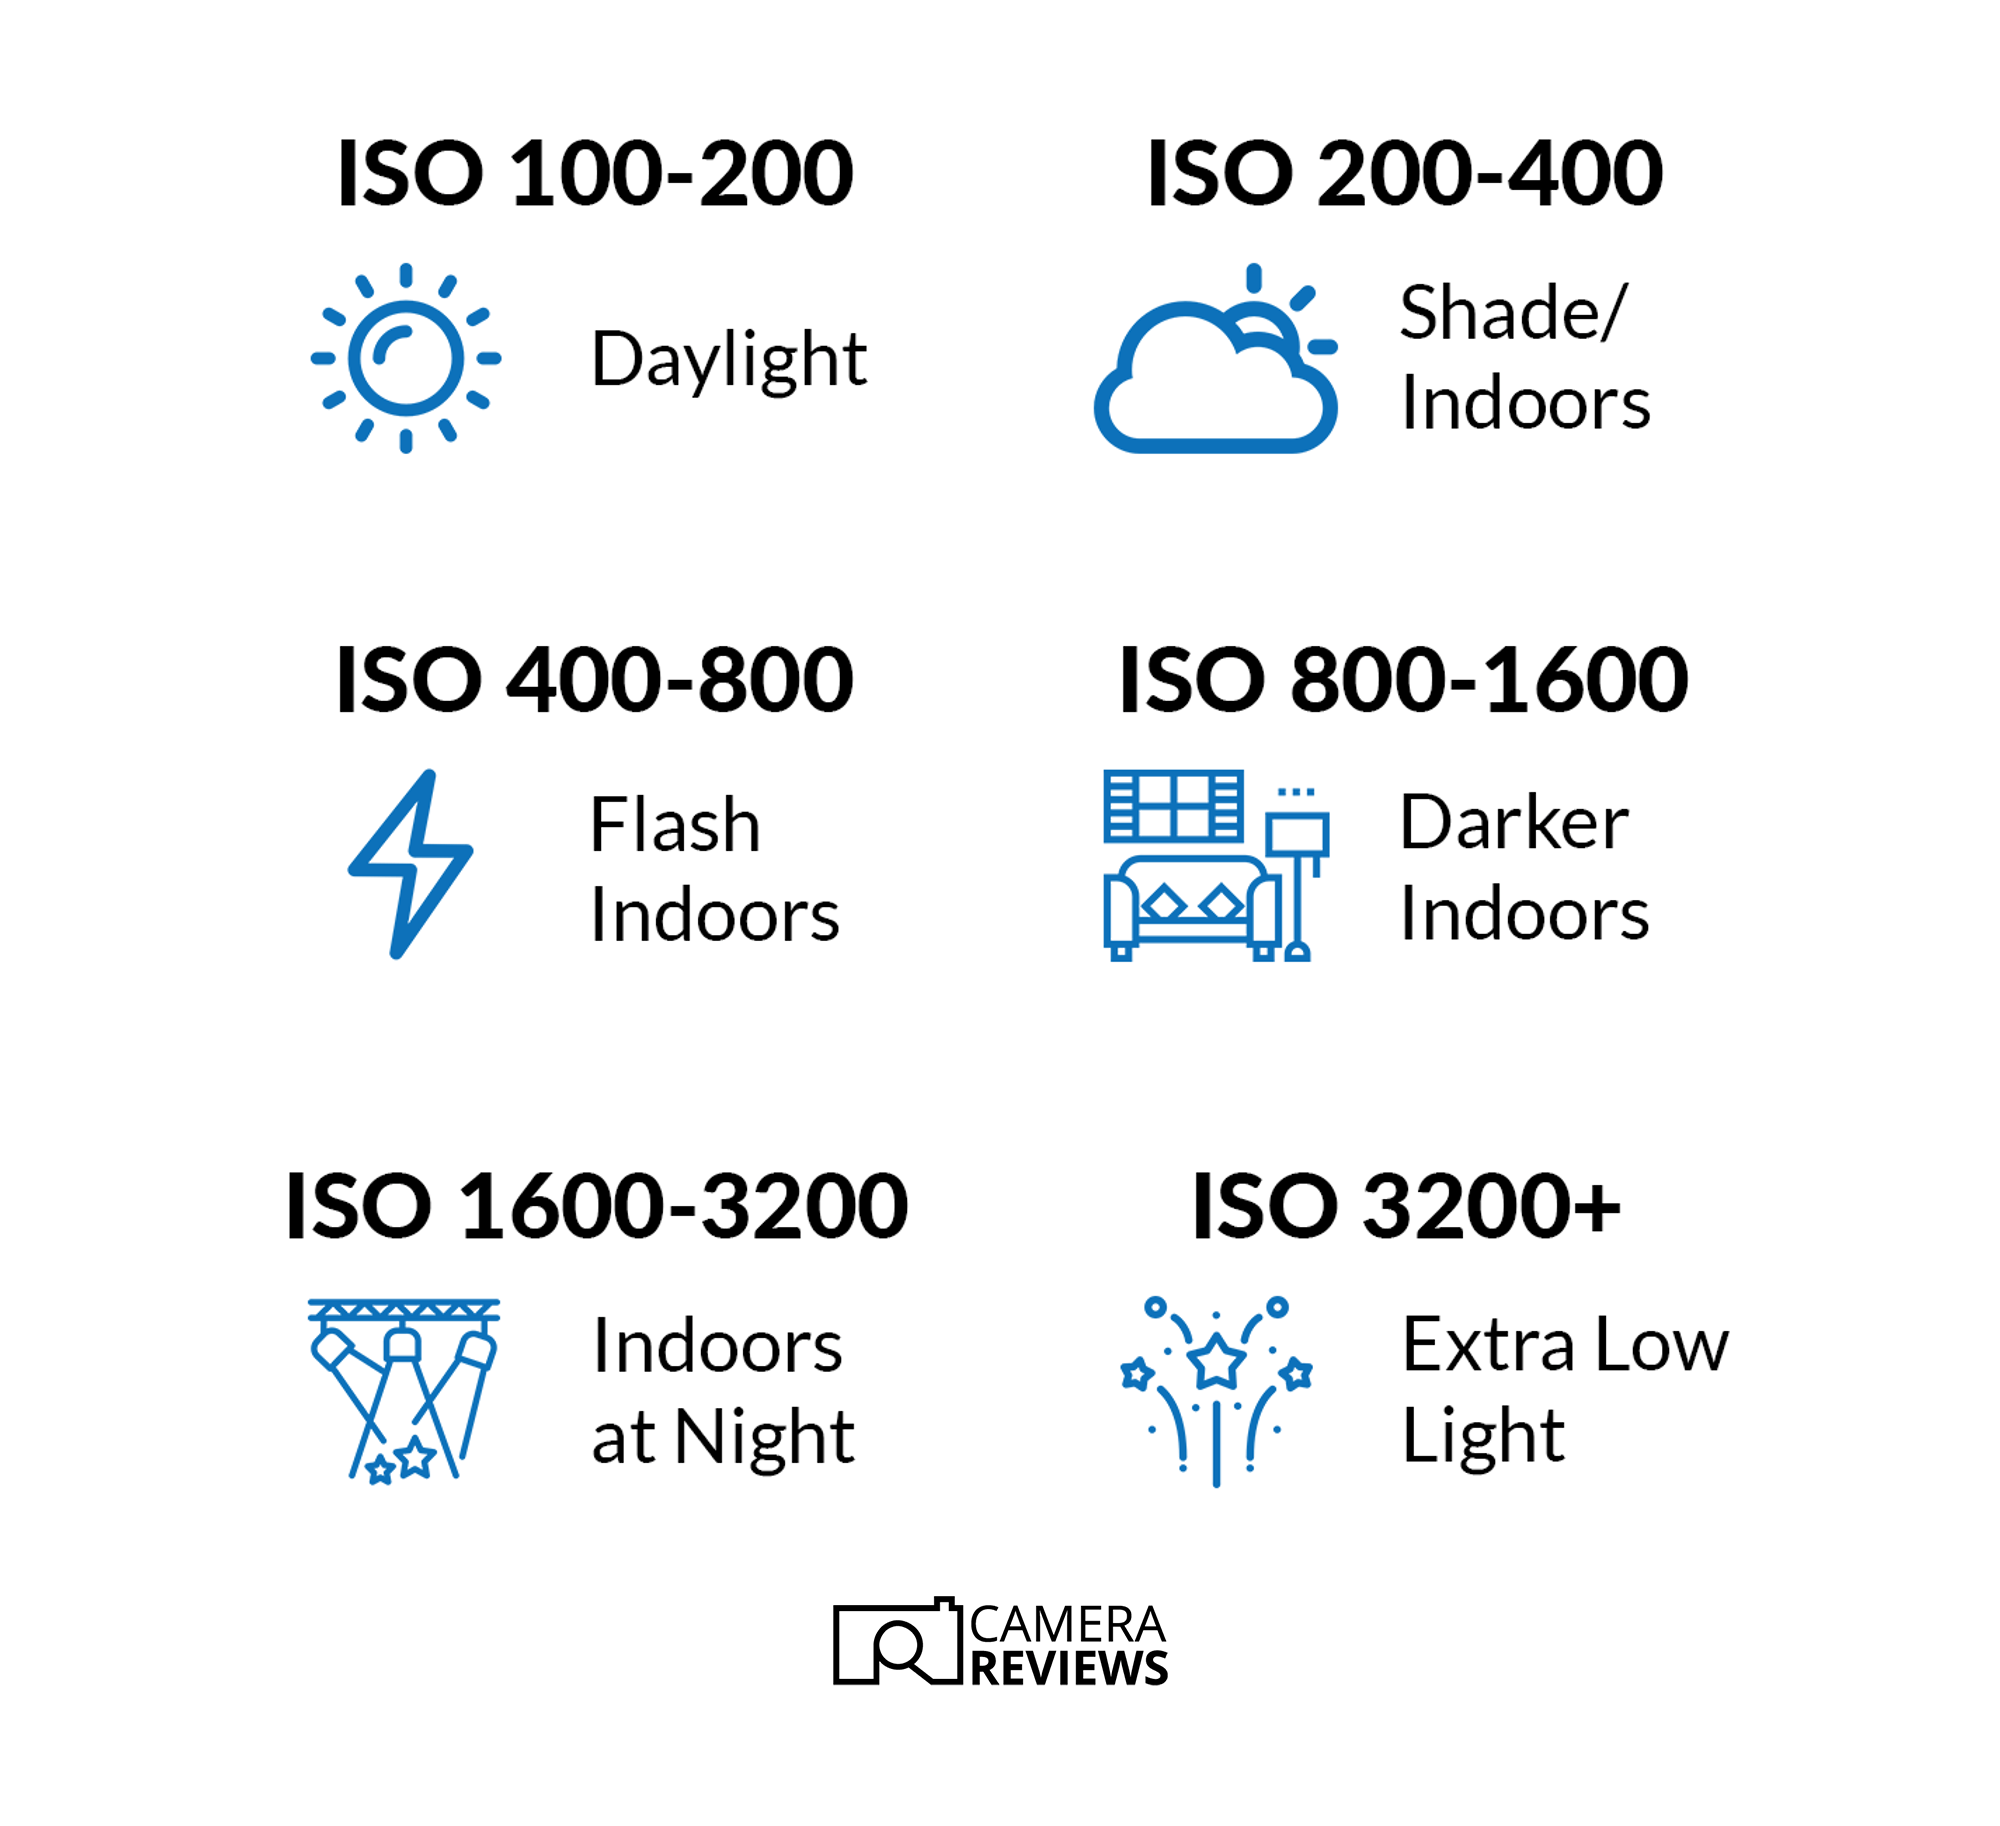
Most cameras have a base (or lowest possible) ISO of 100. But some Nikon cameras start at 64.
Also, most cameras let you artificially extend the ISO range. So you might be able to select 30 ISO or even lower.
Changing the ISO has no creative impact on your shots. But high ISOs can lead to poorer image quality. And there are several other problems:
As a result, choosing the right combination of shutter speed, aperture, and ISO is always a trade-off.
There’s rarely enough light to give you the camera settings you want. This means you usually have to put up with more blur or noise than you’d like.
Modern DSLRs and mirrorless cameras have an exposure (PASM) dial that lets you choose between convenience and control. These are the main modes:
Which exposure mode to choose depends on your abilities and what’s important in the shot. Auto (A) or one of the Scene modes is fine if you want the camera to do everything.
But if you’re happy with more responsibility and perhaps want to get more creative, you’ll want more control. Program mode can ensure you use the optimal (or lowest possible) ISO.
If the depth of field is important, you might choose the Aperture Priority mode. If you’re worried about motion blur or camera shake, you might choose Shutter Priority mode.
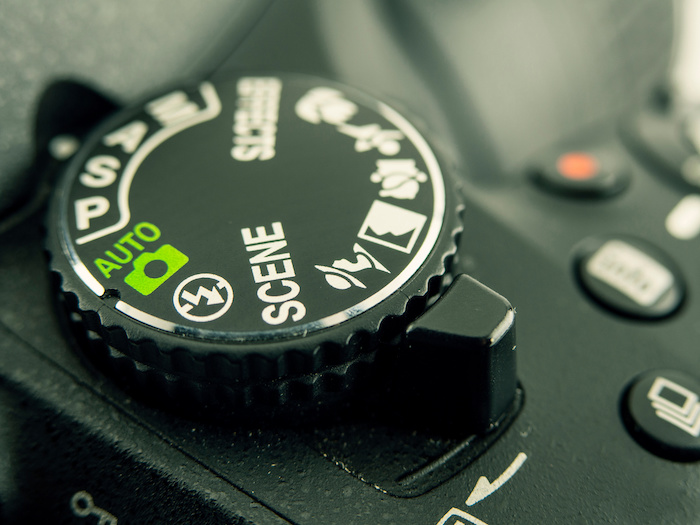
Finally, you’ll need Manual mode if you want absolute control over all the exposure settings.
The other important setting is Auto ISO. This automatically sets the ISO and lets you get creative with the aperture or shutter speed as necessary.
I almost always shoot in Manual mode with Auto ISO. This means I don’t have to worry about the exposure and can concentrate on setting the right aperture and shutter speed for each shot.
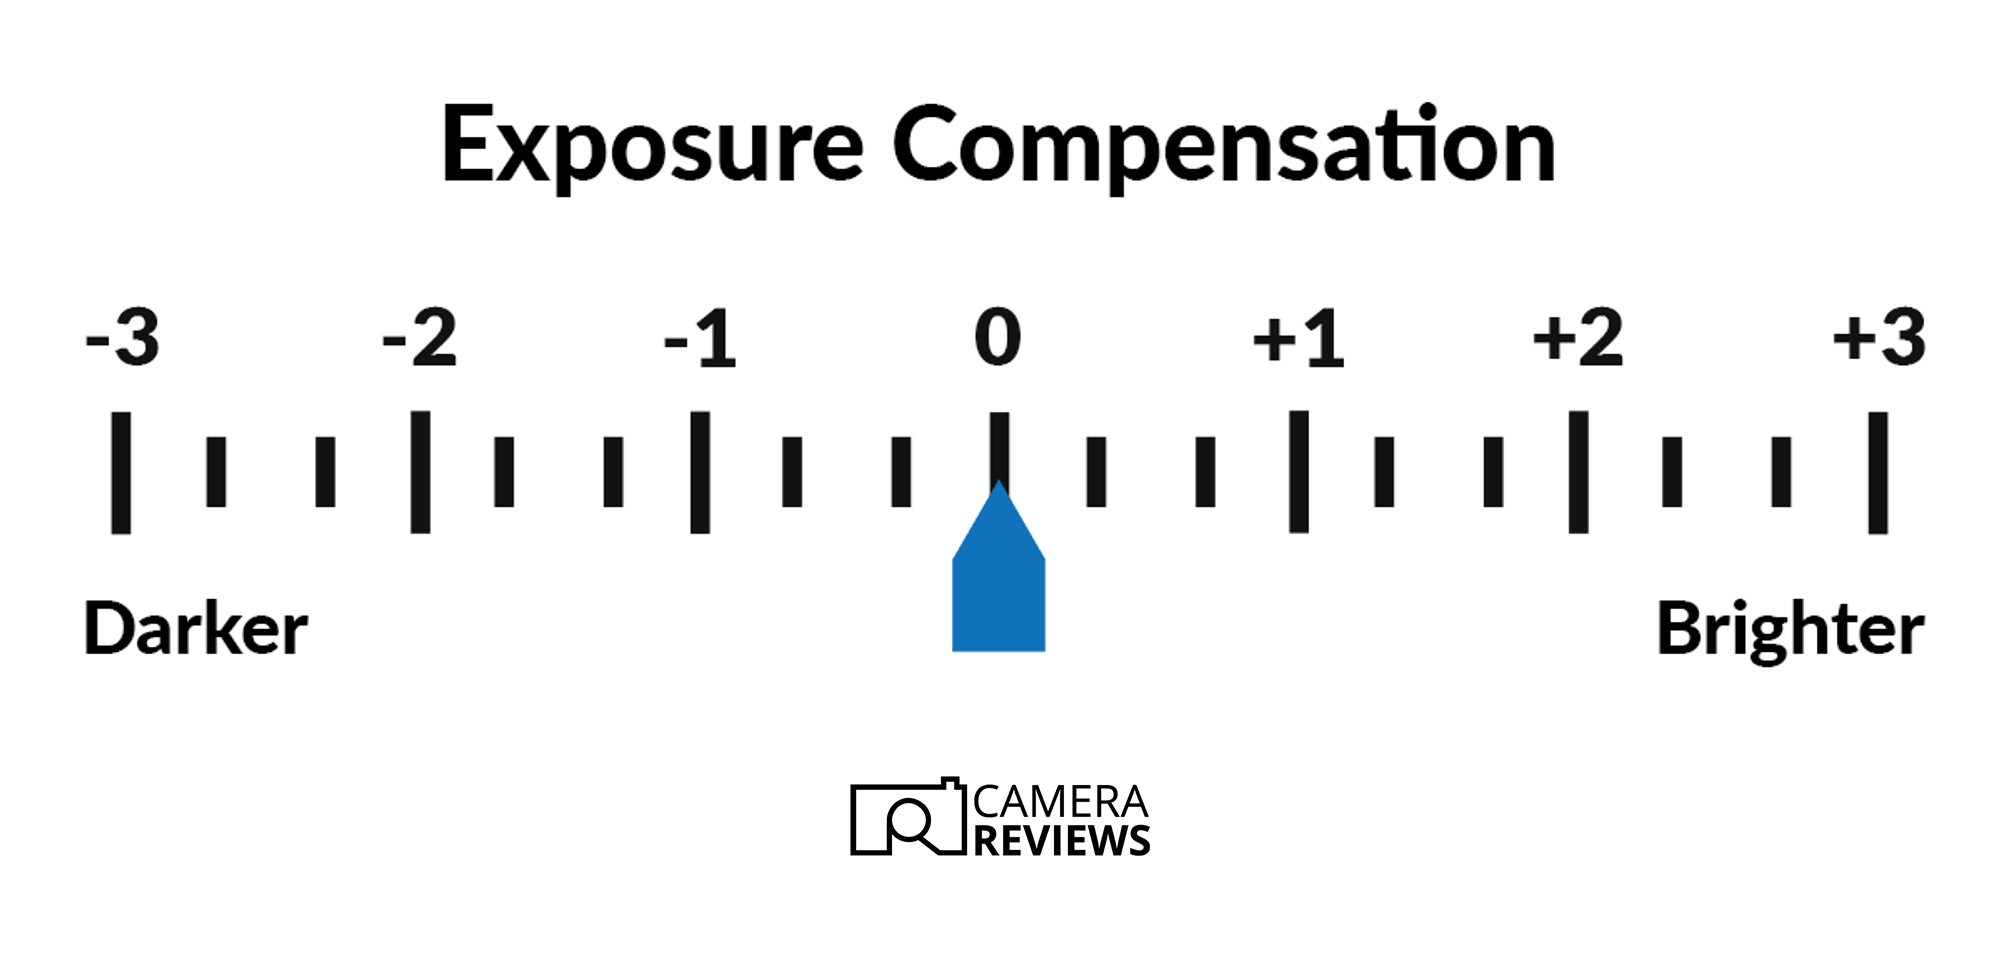
Exposure compensation is a way to “help” the camera get the best exposure. You just have to ensure you’re in Shutter Priority, Aperture Priority, or Manual mode.
Some cameras (including mine) have a dedicated dial on the top plate. This makes it easy to choose one or two positive or negative compensation stops to brighten or darken the image.
You might need exposure compensation because the camera is always guessing. It doesn’t know how bright the scene should be. It is always based on assumptions and averages.
But the world doesn’t always reflect 18% of light. If you take a picture of a polar bear on ice, the camera will “think” it’s bright sunshine. So it reduces the exposure to hit the 18% target.
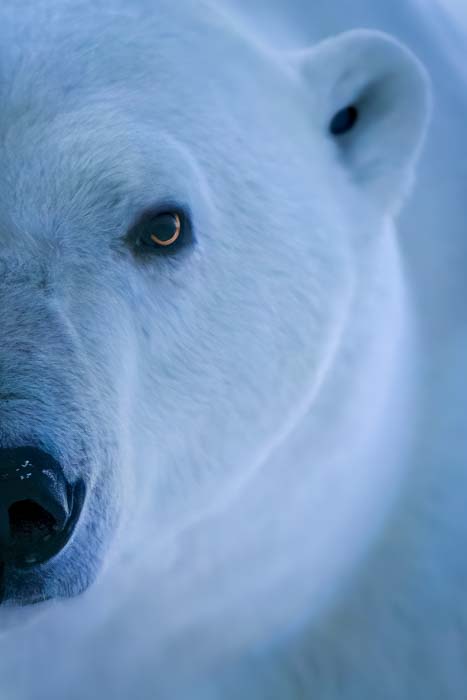
Unfortunately, that means the polar bear and the ice will be grey rather than white!
The same happens in reverse if you’re shooting a black bear in the forest, say. The camera will increase the exposure to hit its target. And you end up with an overexposed shot of a grey bear!
Exposure compensation solves that problem for you. If you spot in advance that the camera’s likely to be fooled, you can brighten or darken the image accordingly.
The scale is in “stops” or Exposure Values (EVs). So +1 EV means the image will be twice as bright. And -1 EV means it’ll be half as bright.
Shutter speed, aperture, and ISO make up the Exposure Triangle. It controls the brightness of your images. So you need to know how to choose each setting for the best results.
As well as the exposure, the aperture controls the depth of field, the shutter speed controls motion blur, and the ISO controls grain or noise.
If you want to leave it up to the camera to decide the exposure, you can use Auto or one of the Scene modes. But the more confident you become, the more you’ll want to control the exposure.
Plus, the more creative aspects of photography will be available. You can gain more control by choosing Shutter Priority, Aperture Priority, or even full Manual mode.
Plus, Auto ISO lets the camera fix exposure while you focus on the more creative settings. And if it makes a mistake, you can use exposure compensation to brighten or darken your images.
These are the three most asked questions we get about these terms. We hope they help beginner photographers understand them better.
Aperture is the size of the opening in a lens through which light enters the camera. Shutter speed is when a camera’s shutter opens, allowing light to reach the sensor. And ISO measures the sensitivity of the camera sensor (or film) to light.
These three factors are the primary controls for adjusting a photo’s exposure. Aperture, shutter speed, and ISO also have secondary effects on depth of field, motion blur, and image noise.
No one-size-fits-all “best” aperture, shutter speed, or IS exists. It depends on the specific shooting conditions. So consider the specific scenario and make adjustments accordingly.
For example, a lower aperture (larger opening) is good for creating a shallow depth of field. But it may result in less sharpness.
Similarly, a high ISO may allow faster shutter speeds in low-light conditions. But it results in more noise.
When you take a photo, you need to think about how bright the place is and how you want your photo to look.
The aperture controls how much light enters the camera. Shutter speed controls how long the camera is open to the light. ISO controls how sensitive the camera is to light.
If it’s bright outside, you can use a lower ISO and a faster shutter speed. You might need a higher ISO and a slower shutter speed if it’s dark.
Choose the aperture based on how much you want in focus. And practice finding what works best in different situations.
Try our guides on understanding the best sunset photography settings or choosing a camcorder vs DSLR for video next!