Cropping in photography is a powerful technique. A good crop can transform a good image into a visually compelling masterpiece. As you embark on your creative journey, understanding the basics of cropping becomes a crucial skill set.
It’s not merely about trimming excess edges. It’s about refining your composition. You want to emphasize focal points and ultimately shape the narrative within the frame.
Cropping in photography allows you to cut out the parts of the photo that you don’t want. And it lets you focus on the most important areas.
Our article teaches you how to crop your photos like a pro! First, we’ll give you some tips on cropping in photography. Next, we’ll give you some basic techniques to crop and rotate in Photoshop and Lightroom.
![]()
Cropping is not a fancy skill. But you still need to be careful when you crop a photo. Understanding composition in photography is crucial before you start to crop.
Cropping gives you another chance to finalize your composition. And one of the best ways to crop is to use the golden rule—the rule of thirds.
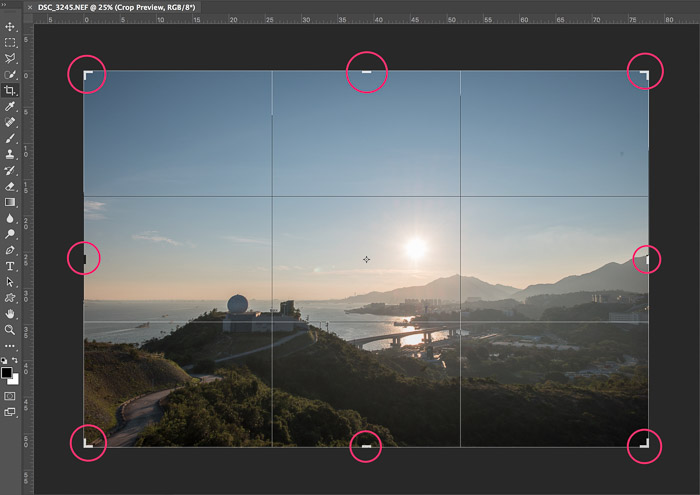
When you trigger crop tools in Adobe Photoshop and Lightroom, the four lines appear by default (photo below). This can help you crop photos better without guessing.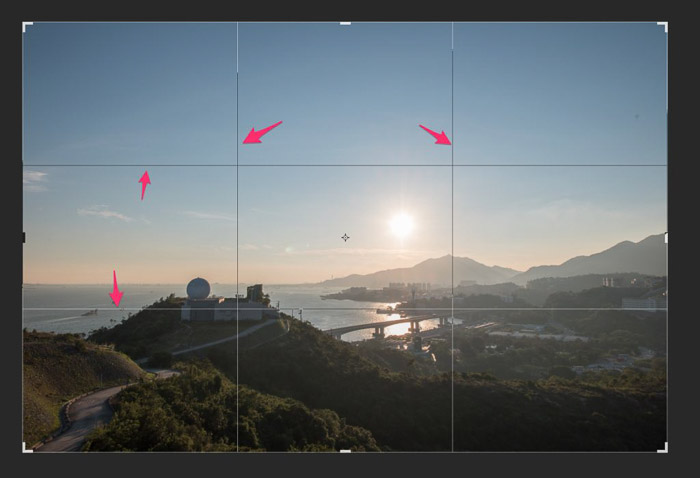
This divides your image into three parts, both horizontally and vertically. You then place your subject onto an intersection point or line. Your image becomes more visually pleasing when you place the subject at the intersection.
Another way to use this rule is to place two subjects on diagonal intersections. This is a more advanced composition skill. For example, in the travel photo below, I put the observatory on the bottom-left intersection and the sun on the top-right intersection.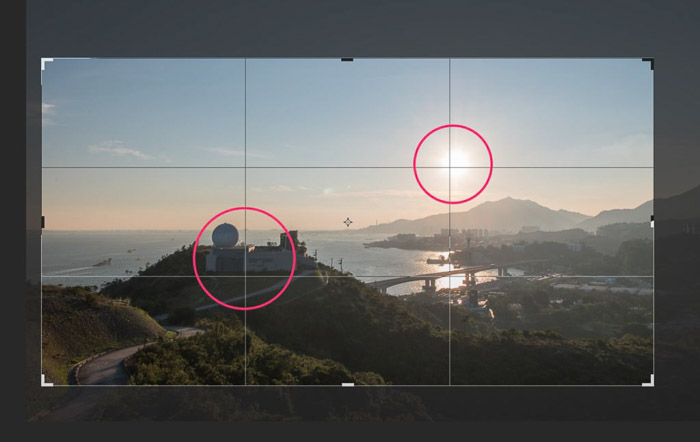
This composition creates a perfectly balanced image. Both subjects pop out when you first see the image. Here is an article for more elaborate details on the Rule of Thirds.
When shooting landscapes, the horizon plays an important role in your image. If your image has a tilted horizon, your audience will sense something is off.
This rule can apply to any type of photography. You need to pay special attention to the horizon level when shooting, or you should correct it in post-processing.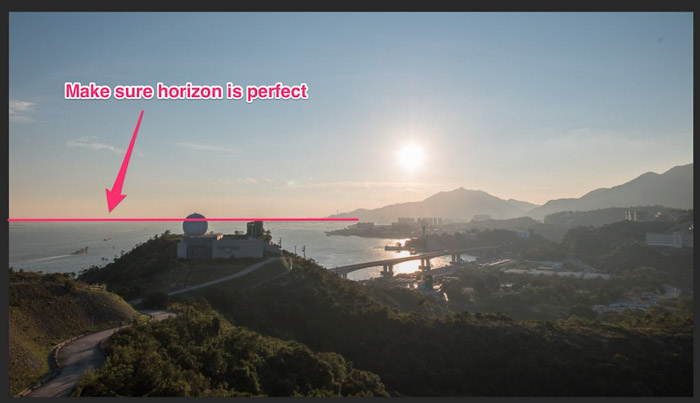
When you shoot with a wide-angle lens, the horizon line may curve when it deviates from the center. This does not pose a big problem to the viewer if it is perfectly balanced from left to right.
Again, this can be corrected with editing software. But when you shoot with this lens type, a small tilt can result in a huge curve in the final image. So, make sure you are keeping your lens straight when shooting.
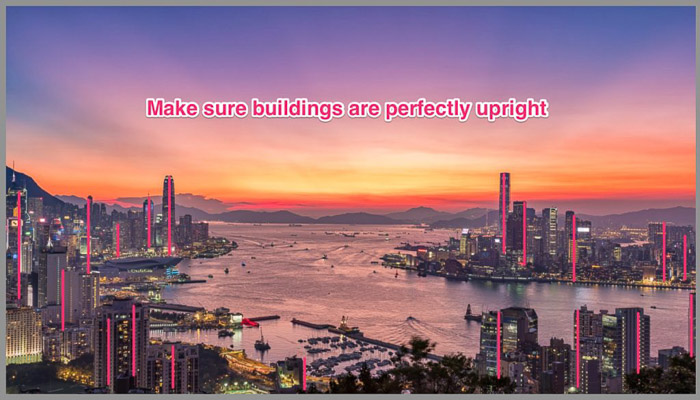
I take advantage of living in Hong Kong, one of the world’s busiest cities, by shooting lots of cityscapes. When shooting a cityscape, I find upright buildings important for a balanced composition.
But, again, whenever you shoot with a wide-angle lens, the unique perspective of the lens does not let you shoot a perfectly upright image. Lines are only vertical if you shoot at a perfectly horizontal level.
Using post-processing crop tools can help fix this problem easily. Editing software like Adobe Lightroom has automatic correction and vertical perspective tools.
But even though you can use crop tools to create the perfect upright perspective, you still need to be aware of the horizon. If you tilt away from the horizontal level too much, even powerful crop tools cannot help you to fix the problem.
Some photographers like to use wide-angle lenses to include everything in the composition. This is a good idea when shooting landscape photography. But sometimes you might also include some boring or unwanted details in your photos.
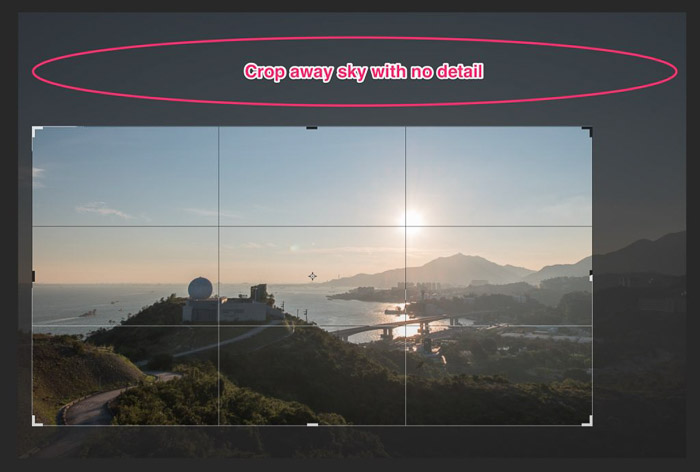
For example, I shot the photo below with a wide-angle lens. As you can see, there were some people on the right, and that was something I wanted to exclude from my final image. Cropping that area away was s the easiest way to remove it.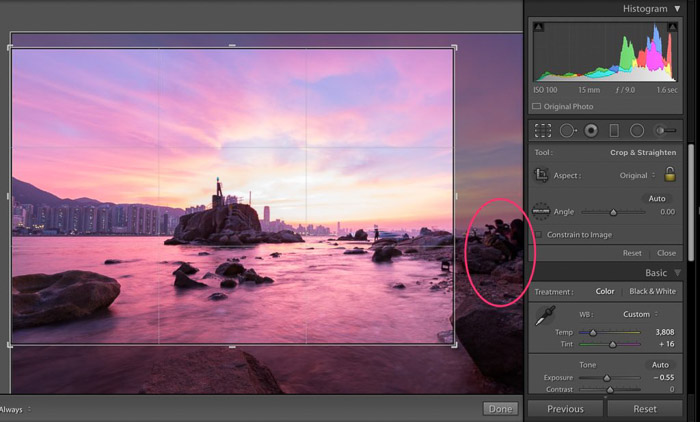 Here is another example below. The sky is blue, which is nice when shooting landscape photography. But there are no clouds. This makes the sky a bit boring, especially when including so much of it.
If that’s the case in your images, too, you can try to crop away part of the sky. That way, you have a tighter composition.
Most cameras give you a 4:3 or 5:4 aspect ratio, while some let you choose 16:9 as well. I seldom change the aspect ratio when shooting. But I always use the camera’s maximum allowable resolution. There are two reasons behind this.
First, when I change the aspect ratio, I’m actually asking the camera to crop the image for me. When the camera does this, it is always a permanent crop. In order words, if you shoot in 16:9, you cannot return to 5:4 if you change your mind later.
The second reason is that I always want a big buffer area for the most control over my photos. When you ask your camera to shoot in 16:9, it always crops the upper and lower parts.
The sharpest part of an image is the area close to the middle. But sometimes, we may have a shooting error and want to use those areas above and below that were cropped out. So, use the largest (default) aspect ratio.
You can also try freeform cropping without following any aspect ratio when editing images. Or you can try to use more extreme ratios like 21:9 or 1:1 for more creative compositions.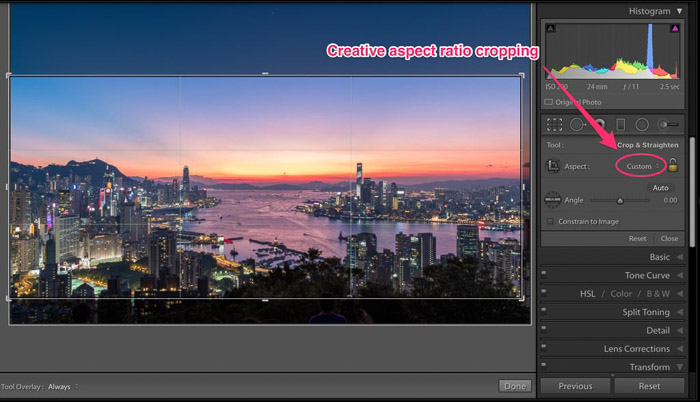
Cropping should be the first step in your post-processing workflow. This is because your eye can be easily misled.
If you adjust exposure, color, contrast, or anything else, you see your image as a whole picture. Any unwanted details will affect your adjustment.
Thanks to the increasing image size in today’s cameras, you can easily capture an image over 20 megapixels (MP). Using a more advanced high-resolution camera, you can even take 40 MP or larger images.
If you don’t plan to make a super huge print or display your images on an 8K monitor or above, you have plenty of buffer when capturing images in full size.
We should consider three points when cropping photography—size, rotation, and perspective. I will show you how to achieve them in Photoshop and Lightroom (Classic) and some problems you should know.
When you start to crop a photo, the first things to go are unwanted areas in your image. This can make your composition tighter and more focused on the subject.
But cropping also reduces the resolution of your image. It’s best not to over-crop your image so that you have enough pixels for how you want to use it.
To activate the Crop tool in Adobe Photoshop, simply press “C” or click the Crop tool icon in the toolbar.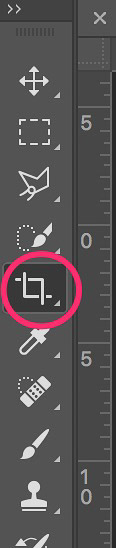 A rectangular box will appear for your crop. You can adjust the crop box by dragging the corner or side handles.
 Enter the aspect ratio in the top toolbar if you want to fix it.

The Crop tool in Adobe Lightroom works almost the same as Photoshop. The hotkey to activate the Crop tool is “R,” or click the Crop tool icon. The aspect ratio can also be adjusted here.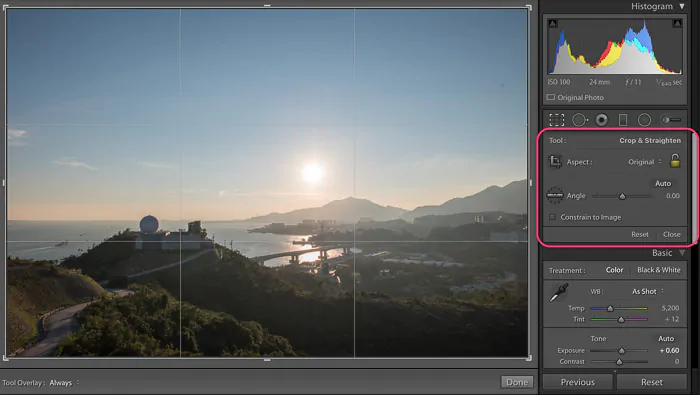
When you are shooting a landscape, the horizon line is very important. It’s even more important when you shoot sunset photos! If you misalign it, your photo may look strange and askew. An easy rotation of the image can fix the problem.
Sometimes, if you shoot travel photos that have people in them, you can use creative composition tricks like diagonal lines. In those situations, you may need to rotate your image more extensively. Shooting with more buffer for a post-process crop is a smart choice.
To rotate your image in Adobe Photoshop, you must first activate the Crop tool. Then, move your cursor over an empty area around one of the photo’s corners.
You should see the arrow become a curved line with two arrows. You can then drag your mouse to rotate freely.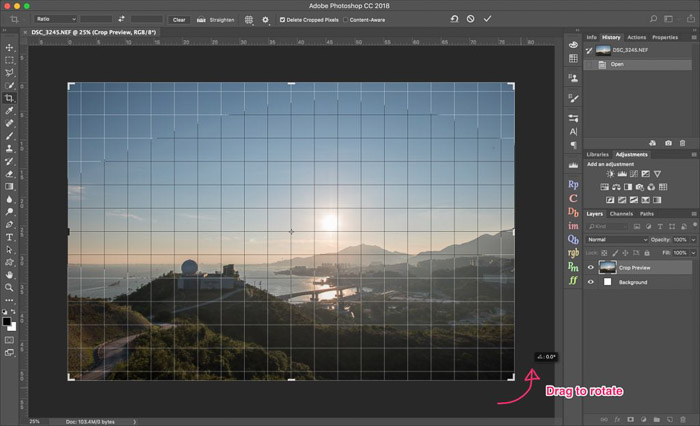 The second method uses the ruler tool in the Crop tool’s top menu. Click the icon that looks like a ruler in the toolbar. To use the ruler to straighten your photo, you must define the horizontal horizon line for Photoshop.
Draw a level horizon line on your image, and Photoshop aligns the horizontal level to the line you drew. This tool is handy when you include the horizon in a composition.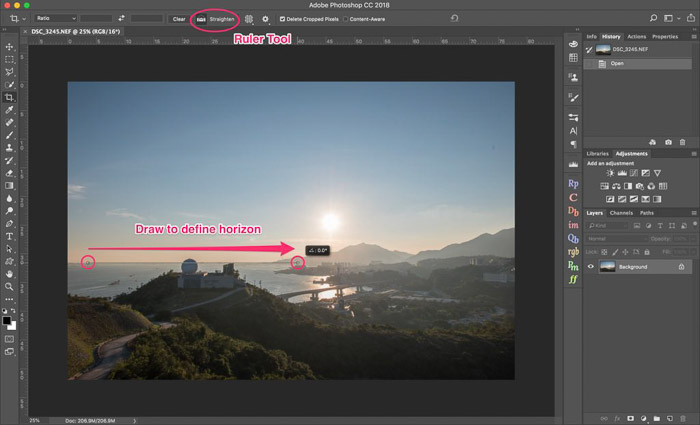
Similarly, you can rotate images in Adobe Lightroom by dragging the Angle slider after you activate the Crop tool. The ruler tool (straighten tool) is also available after activating the Crop tool.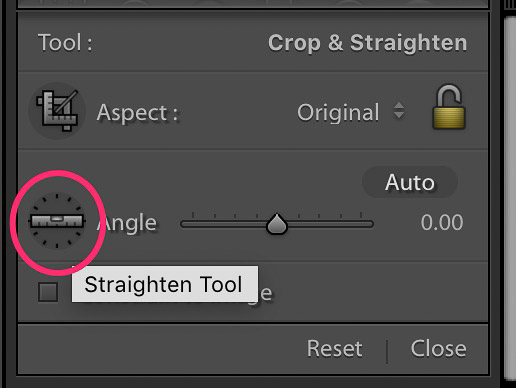
If you use a wide-angle lens to shoot cityscapes, you may encounter the following problem. Even if the horizon is straight, the vertical lines of the buildings may not be upright. This is because of perspective distortion.
You can fix this by using a tilt-shift lens. But tilt-shift lenses are extremely expensive. Another way is to fix it in post-process cropping.
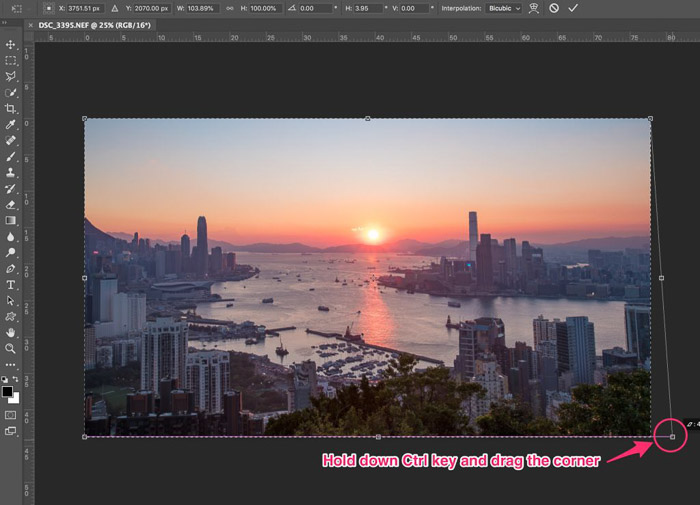
It’s best to use the Free Transform tool to adjust a photo’s perspective in Adobe Photoshop. First, select the entire image with Ctrl or Command+A (PC or Mac). Then, click Ctrl or Command+T to activate the Free Transform tool.
You can see that it looks like the Crop tool, but the corners become four small squares. Hold down the Ctrl or Command key to adjust the vertical perspective and drag the corners to the left and right.
You can drag them up and down to adjust the horizontal perspective.
Unlike Photoshop, there is no Free Transform tool in Adobe Lightroom. But you can find perspective correction under the Transform panel. You can use the slider to adjust both horizontal and vertical perspectives.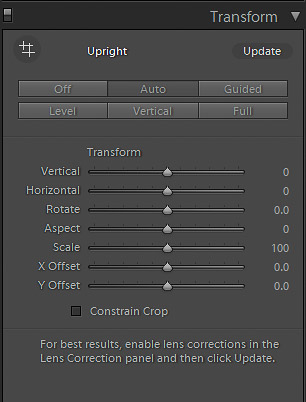 You can also use the auto upright function to let Lightroom Classic do it. This is only accurate when your image contains lots of vertical lines, like cityscape images.
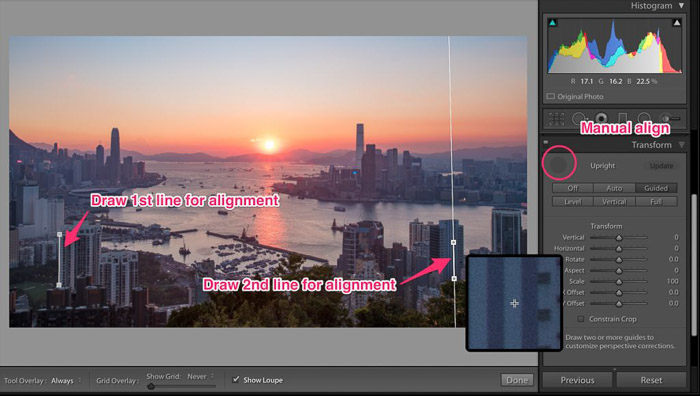
The third way is to use the manual align option.
You first draw two lines to show the correct vertical lines in the images. I recommend you draw one line on the left and one on the right. Lightroom then aligns the vertical perspective according to these two reference lines.
With these basic tips and techniques, you can elevate your photography by creating more visually engaging images.
Cropping is an easy process and can help improve your photos. Mastering the art of cropping in photography opens a gateway to enhanced storytelling.
But don’t rely too much on cropping. Capturing the best composition when you release your shutter is always better than fixing it in post-production.
With this in mind, go forth and shoot with confidence. You know how to crop if and when you need to. Experiment and let your own perspective shine through in every frame. Happy shooting!