Here’s a quick guide to all the key indoor photography settings with a camera. Modern cameras are complicated devices. So it’s not just about the aperture, shutter speed, and ISO anymore.
You might want to take indoor photos without an external flash for many reasons. For example, you might do product photography, portraits, or real estate shots.
But light levels will generally be much lower than outside with a different color temperature. That means it’s vital to choose the correct settings for indoor photography.
These indoor photography settings should help you avoid certain problems. They will help prevent you from taking images that suffer from blur, noise, or an unnatural color cast.
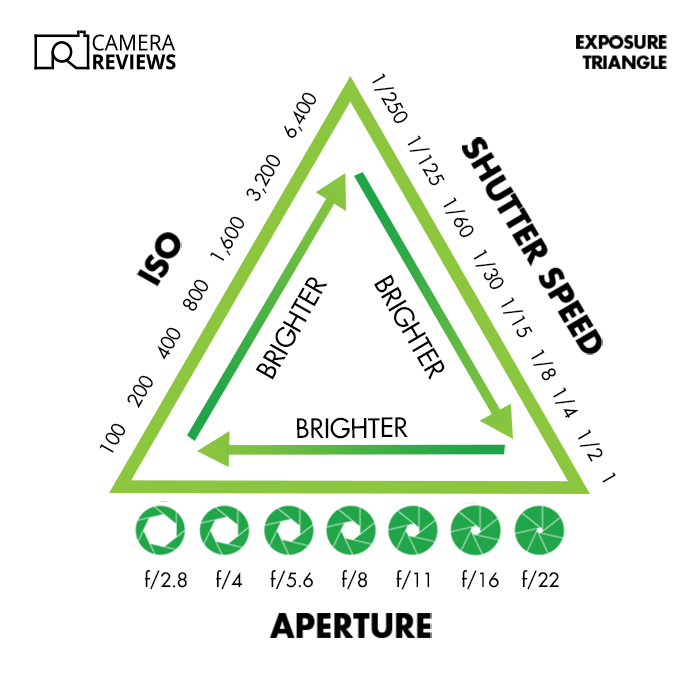
The aperture, shutter speed (or time value for Canon users), and ISO are the three camera settings that form the “exposure triangle.” These control how bright your images will be.
But how you get there depends on the exposure mode. Most modern cameras let you choose between manual mode, aperture priority mode, and shutter priority mode (plus a few others).
Each of these lies on a sliding scale. They give you more or less control over the aperture, shutter speed, and ISO.
You must choose the full manual mode and set your own ISO for total control. This helps avoid inconsistencies as long as the color temperature and quantity of the light don’t change.
But the danger is that you might get the brightness slightly wrong if you ignore the built-in exposure meter. If you’re worried about that or you just want the camera to manage brightness levels, you have three main options:
Many photographers (like me!) shoot manually with auto ISO. The main advantage is this you control the key camera settings while the camera manages the brightness using the ISO.
You can also use auto ISO with aperture or shutter priority. But you might not know which setting will change to adjust the brightness. It might be the ISO, or it might be the aperture or shutter speed.
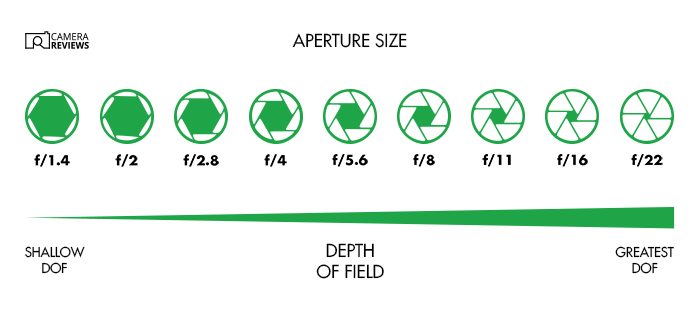
The aperture is the lens’s hole through which light reaches the camera sensor (or film). It comprises a diaphragm of several metal “leaves” that open and close according to the aperture setting.
The aperture values can look confusing. But it’s worth getting to know the main ones.
In the image below, each successive f-stop lets in exactly half as much light as the preceding one. This means the gap is always one stop—or one “exposure value” (1 EV).
If you’re good at math, you might notice that each term in the sequence is roughly 1.4 times the one before. And every other term is exactly double.
That’s just because of the way you work out the f-stop, which is the diameter of the entrance pupil divided by the focal length. (The entrance pupil is where the aperture seems to be when you look through the front of the lens.)
If you’re shooting indoors, you’ll probably want to keep the aperture as wide as possible. For instance, f/2.8 rather than f/8. This lets the most light in.
Plus, it lowers the required ISO or shutter speed. And it helps the AF system to acquire focus.
But the aperture also controls the depth of field. Shooting wide open at f/1.2 or f/2.8 might mean that you can’t get everything in focus. This is especially important when you have more than one subject, and both need to be sharp!
There’s no easy answer, and almost everything in photography involves a compromise. You need to consider the type of shot you want to take and decide whether the light level or depth of field is more important.
Another constraint is the particular type of lens you’re using. Zooms and cheaper lenses tend to have narrower maximum apertures. So you might not be able to shoot at the aperture you want.
Again, it’s a trade-off. You might want to invest in a faster prime lens. But it would probably be much bigger and more expensive!
One way of avoiding the depth of field problem is to use a shorter focal length. Wide-angle lenses from 12-35mm generally have a wider maximum aperture. But they also create more depth of field. That means it’s a win-win!
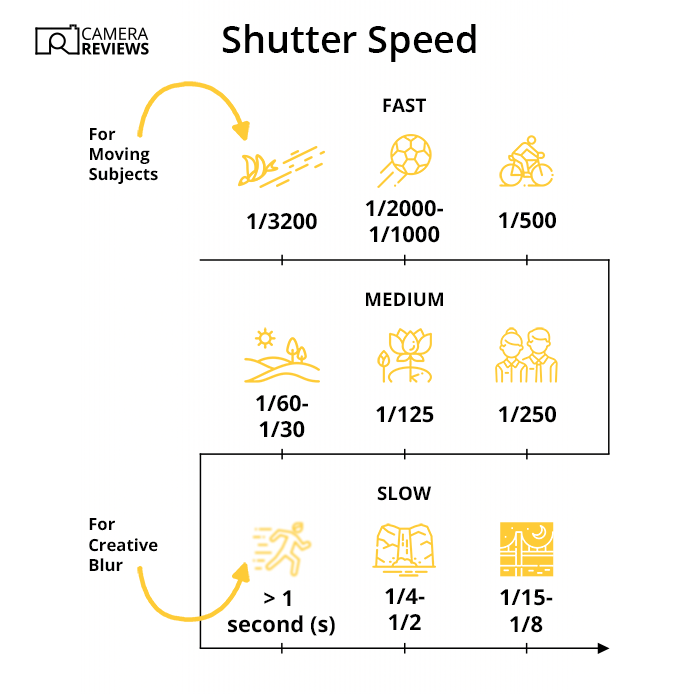
The shutter speed is not a “speed” at all. It’s simply the length of time that the mechanical or electronic shutter is left open during the exposure.
Like the aperture, the shutter speed is vital to control the brightness of your images. All other things being equal, longer shutter speeds mean more light hits the sensor. This means a brighter image.
But there’s another trade-off involved. The shutter speed also controls the amount of motion blur in your images. Camera shake and moving subjects cause blur at slow shutter speeds. So low light indoors might limit your choice.
Fortunately, wide-angle lenses come to the rescue once again! They’re easier to handhold as they’re lighter than telephoto lenses, whose focal length magnifies any movement.
An old rule of thumb says you shouldn’t handhold a lens at a slower shutter speed than one over the focal length. In other words, you shouldn’t shoot at anything less than 1/400 s using a 400mm lens. But you can happily manage 1/30 s with a 30mm lens.
The other technical fix is “image stabilization” (“vibration reduction” for Nikon users). Most lenses and mirrorless cameras have stabilization. Some bridge cameras also have stabilizers.
They let you shoot at much lower shutter speeds without causing motion blur. The benefit can be up to 8.5 stops. So it’s worth switching on for indoor photography!
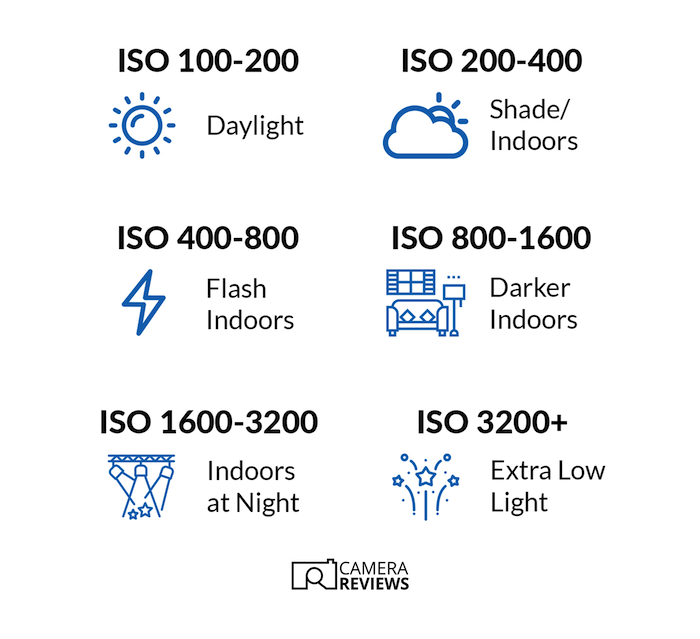
The ISO measures the sensitivity of the camera sensor. The letters don’t stand for anything. The International Organization for Standardization coined the term. It’s based on the Greek word isos, meaning equal.
The higher the ISO, the more sensitive it is. So 200 ISO is twice as sensitive as 100 ISO. Higher ISOs are a benefit in low-light situations.
But there’s a drawback—as ever! The higher the ISO, the more digital noise is created. This reduces sharpness, contrast, and color rendition.
So ideally, you want the lowest possible ISO. That’s usually 100 ISO. But some Nikon cameras let you use 64 or even 31 ISO (using extended settings).
Because the ISO only affects noise rather than any “artistic” elements, there’s no dedicated “ISO priority” exposure mode.
But maybe image quality is a priority, and your subject is stationary. If so, you should set your camera to its native ISO of 100 or 64.
If you shoot in aperture priority mode, you can choose the aperture while the camera picks the matching shutter speed. Longer shutter speeds are fine on a tripod. But you might have to compromise if you shoot handheld in low light.
The built-in exposure meter in your camera helps work out the right exposure. It works in different ways, depending on how much of the frame you want to be used for the calculation. There are three main modes:
The last of these is by far the best and most reliable. So you shouldn’t need to use anything else. But if your images have a lot of contrast, you might want to change it to another.
You can restrict the metering to the central area or even a single spot on your subject (or something with a mid-tone). You can stop the camera from being “fooled” by a particularly bright or dark background.
You can use exposure compensation for any exposure mode other than full auto or full manual with manual ISO. This is a handy way to control the brightness of your images. Positive exposure compensation will make them brighter and vice versa.
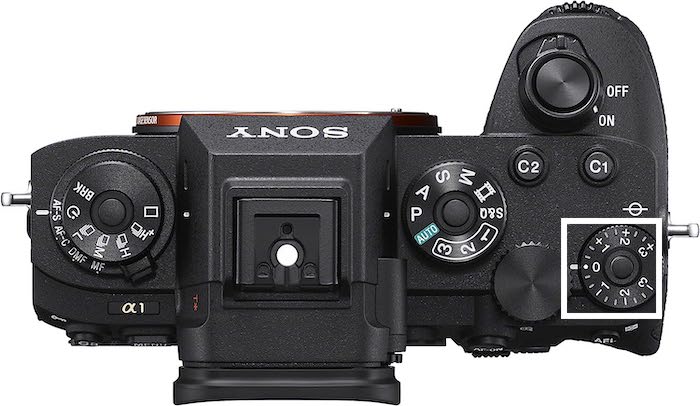
Some cameras, such as my Sony a1, have a dedicated dial running from -3 EV to +3 EV. It’s a great way to control the exposure of your images consistently and predictably.
For indoor photography, you might want a dark and moody look. So you might dial in -2 EV of exposure compensation. This plays out in different ways, depending on the exposure mode:
The same happens in reverse if you choose positive exposure compensation for brighter images.
Most cameras let you choose how many shots you take at a time. “Single shot” means just that. But a burst rate of 30 fps means the camera will take 30 frames a second (until the buffer’s full).
You can often select low, medium, and high continuous shooting speeds. I’m a wildlife photographer. So I usually shoot fast-moving birds and animals at the Sony a1‘s maximum RAW burst rate of 30 fps.
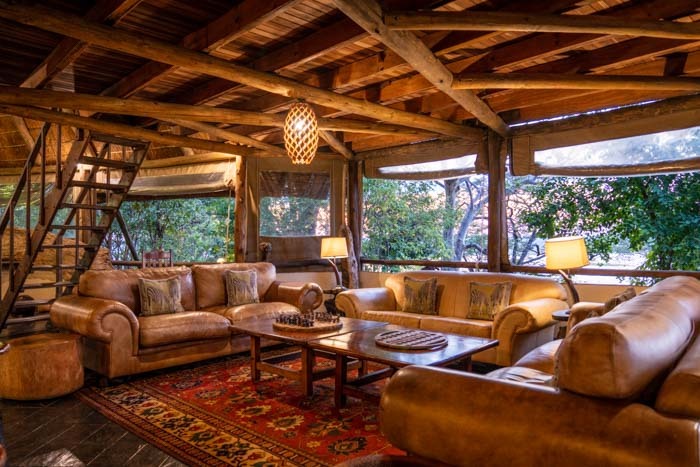
But people sometimes ask me to take pictures of safari lodges. In that case, I switch to a single shot. Nothing is moving in any of the rooms. So there’s no need to take more than one or two pictures from each point of view.
It’s the same for most kinds of indoor photography. But if you’re shooting a concert or sporting event, you’ll need the extra insurance that comes from shooting in continuous mode.
There’s no way of telling when the perfect shot will be with movement. So you have to take a burst of shots to give yourself more frames to choose from.
Speaking of indoor events, one problem you might face is the flickering of fluorescent lighting. This is about 120 Hz (Hertz). And it can play havoc with a camera’s exposure meter, leading to underexposed or overexposed images.
Fortunately, many modern cameras have an anti-flicker mode. It’s worth switching on if you’re covering an indoor sporting event. It helps ensure the exposure levels of all your images will be consistent.
The white balance control on the camera or in any editing program reflects the assumption about the color of the light source(s). Here are the most common camera settings:
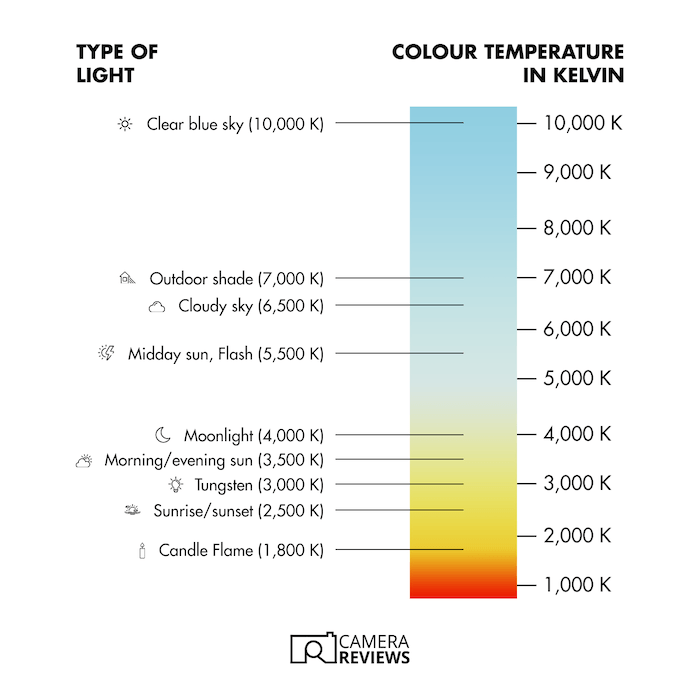
Each setting represents a different color temperature. This measures how “hot” an object is to produce light of a similar color.
The units are Kelvins (K). They measure the number of degrees centigrade (C) above absolute zero, which is -273 C.
Note that “warm,” reddish light is produced at lower temperatures than the “cool,” blueish light. Hence, candlelight is 1000 to 2000K, whereas window light is 5000 to 6500K.
If you want the most accurate white balance, you should set it manually. But you can also “warm up” or “cool down” images.
You can play with the color temperature in editing software like Lightroom. For example, the “shade” setting will give you a warmer look than “tungsten.”
One problem you might encounter with indoor photography? Coping with a mixture of light sources.
Maybe a room is lit by natural light from the outside and artificial light from within. So it might be hard to balance the warm and cool colors.
When shooting wildlife, I use the back button focusing with AF-C (continuous autofocus). It’s still the right way to go with moving subjects at a concert or sporting event. But if your subject is stationary, you can get away with single autofocus (or AF-S).
The other important setting is eye detection. Eye detection is hugely beneficial for taking portraits with a mirrorless camera. Just make sure you’re using the right setting if there are choices between birds, animals, and humans!
If you’re taking product photos or macro shots of insects, focus stacking is a useful tool. The idea is to increase the depth of field by combining a series of frames. And each one is taken while focusing at a different distance.
That way, you can ensure your whole subject is in focus rather than just a small part, like a person’s eye. Some cameras automate the whole process.
But you’ll probably have to combine the images using a specialist program. For best results, it’s important to use a tripod so the camera doesn’t move between shots.
Bracketing is designed to help you get the correct exposure in difficult lighting conditions. It’s a similar technique to focus stacking, except the images are taken at different exposures.
Most DSLR and mirrorless cameras let you take three to nine images, changing the aperture, shutter speed, or ISO each time. One is “correctly” exposed. And the rest are underexposed and overexposed to various degrees.
High Dynamic Range (HDR) photography combines bracketed images. It helps reveal details in a scene’s darkest and brightest areas.
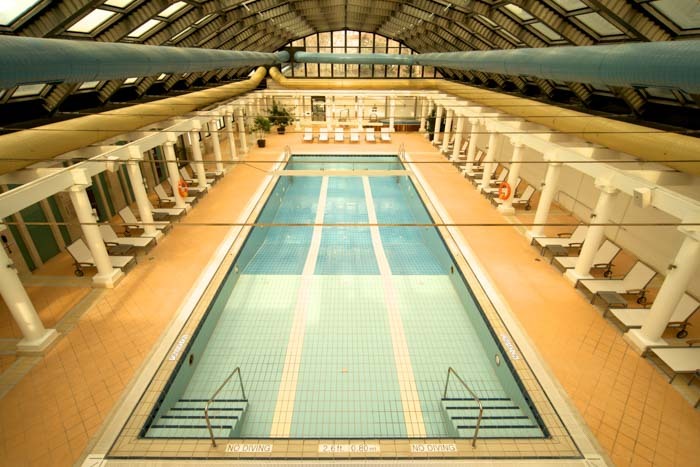
It’s especially useful for real estate photography. It gives the impression that the whole room is evenly lit!
Most DSLRs and mirrorless cameras let you choose between RAW and JPEG images. RAW images contain absolutely all the data captured during the exposure.
Using RAW files means it’s much easier to “rescue” an image by boosting the shadows or toning down the highlights in post-processing.
The JPEG format is compressed. So the file size is smaller. But the compression means some information is lost forever. This typically shows itself in banding and lack of sharpness.
Given that light levels are usually low for indoor photography, it’s wise to shoot in RAW rather than JPEG for maximum flexibility. The other benefit is changing the white balance without compromising image quality.
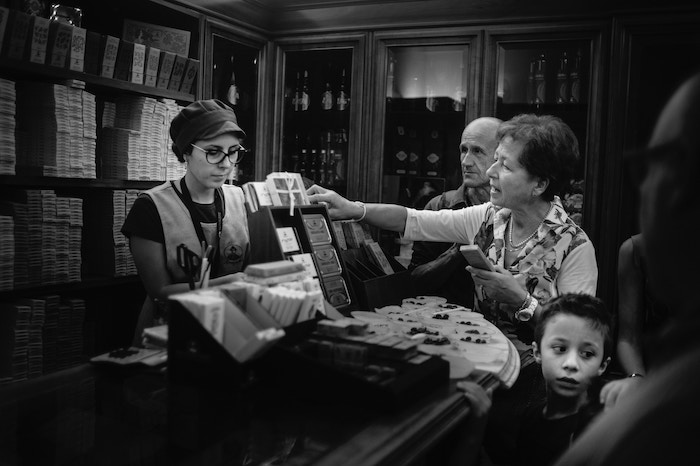
Any shot can, of course, be shown in black and white and in color. But there’s an advantage of shooting black and white for indoor photography.
You can fix conflicting white balances. Who cares if you have a mixture of tungsten and natural light if the pictures are in black and white?
Indoor photography without an external flash is a specialist skill. It may throw up problems due to the level and color temperature of the light.
Trading off the aperture, shutter speed, and ISO is an art rather than a science. So setting the white balance can be hard with conflicting light sources.
There are also other indoor camera settings that you should consider. Those include drive mode, metering mode, and exposure compensation. Whatever your level of experience or genre of photography, I hope this guide will help you avoid some of the major pitfalls!