If your camera has a CMOS sensor, you might get distortion from “rolling shutter effect.” It can affect both still photos and video, and it’s a common problem. Here’s our quick guide to understanding what it is and how to prevent it or fix it in post-processing.

A “rolling” shutter” is a digital camera’s method of capturing an image or video frame. It scans or exposes different parts of the frame sequentially.
Every digital camera or smartphone has a shutter. It can either be mechanical or electronic:
The concept of a rolling shutter dates back to the late 19th century. It appeared in early cameras as a way of controlling the exposure time.
These cameras had a rotating disk with a narrow slit that moved past the film or photographic plate. This allowed light to enter only when the slit passed over it. The design offered a simple way to capture images with varying exposure times.
In the early 20th century, film cameras began to use rolling shutter technology. Cameras like the Mitchell Standard and Bell & Howell Standard had rotating shutters. They even had adjustable blade angles to regulate the exposure.
This technology allowed filmmakers to capture moving images. The shutter angle became a creative tool for controlling motion blur.
The development of electronic rolling shutters came with the digital age. Cameras and smartphones started using cheap Complementary Metal-Oxide-Semiconductor (CMOS) sensors with rolling shutters.
But rolling shutter effect became a concern. Recent advances in CMOS sensor technology have mitigated distortion issues. This has mainly been through improving the readout speed.
Some cameras also now feature global shutters. These capture the entire frame simultaneously, getting rid of any distortion. But Charge-Coupled Device (CCD) sensors are more expensive and less prevalent.
Digital cameras and smartphones use a rolling shutter to capture images and video. It exposes and captures an image in two main phases—exposure and readout.
During exposure, the camera’s image sensor is exposed to light. Depending on the design, this exposure occurs from the top to the bottom or vice versa.
Each row of pixels collects light information as it passes through the camera’s lens. The amount of light hitting each pixel determines its color and brightness. This sequential exposure of rows is the key to how a rolling shutter works.
After the exposure phase, the camera enters the readout phase. In this phase, the sensor processes the information captured during exposure. It reads the data from each row of pixels one after the other, converting it into a digital signal.
The sequential readout is also synchronized with the image sensor’s exposure sequence. This ensures the data is properly matched to the corresponding exposure.
The real-world impact of rolling shutters is distortion. Vertical lines should be vertical, and objects shouldn’t be stretched or compressed. This can ruin your images or videos.
The most common problem occurs when you have a rotating object like a propeller. If you’re flying, capturing the moment with your smartphone should be easy. Unfortunately, rolling shutter effect will distort the propeller, making it almost unrecognizable.
That might not be so bad if you’re just an amateur photographer on holiday. But it would be unacceptable for a pro being paid to deliver images or videos to a client!
The electronic shutter’s design can lead to “rolling shutter effect” (or “rolling shutter”). This happens when filming fast-moving objects or when the camera is in motion.
There is a delay between the exposure of the top and bottom rows of pixels. This means distortion can occur, making objects appear skewed or bent.
Let’s consider a few examples of rolling shutter. If you shoot a spinning propeller or a fast-moving car, the blades might appear bent, or the wheels may look oval.
Also, vertical objects might appear slanted. This is because they change position while the sensor reads the different rows of data.
Minimizing rolling shutter in photography is essential to capturing sharp and distortion-free images. This is especially true with fast-moving subjects. Here are some tips to help reduce these problems.
One of the simplest ways to mitigate the rolling shutter effect is to use a faster shutter speed. A shorter exposure time minimizes the time gap between the capture of the top and bottom rows of the sensor.
This reduces distortion. But you need enough light (or wider apertures and higher ISO settings).
When shooting while in motion, avoid sudden or jerky camera movements. Smooth, controlled pans and tilts can help reduce the effects of rolling shutter.
Use image stabilization, such as optical or sensor-based stabilization systems, gimbals, or tripods. These tools can help steady the camera and minimize unintentional motion.

Consider using cameras with global shutters instead of rolling shutters. Global shutters capture the entire frame simultaneously.
This eliminates distortion issues. But such cameras may be more expensive and are not common in consumer models. (The new flagship Canon EOS R1 is expected to have a global shutter.)
If you’re dealing with fast action, switch to burst mode. Taking several frames boosts your chances of getting one with minimal distortion.
Be mindful of the composition and framing. Try to avoid vertical objects or lines that may appear distorted. Adjust your framing to minimize these issues.
Familiarize yourself with your camera’s rolling shutter characteristics through practice and experimentation. Learn how it behaves under different conditions to anticipate and minimize potential issues.
Some image editing tools like Adobe Lightroom can correct rolling shutter distortion in post-production. While this is not a perfect solution, it can help improve the final result.
The rolling shutter effect is just as common in shooting videos as in taking pictures.
One of the most prominent rolling shutter artifacts is the “jello effect.” When shooting fast-moving subjects or panning quickly, rolling shutters can skew straight lines.
This effect is especially visible in handheld footage of propellers or car wheels.
Rolling shutter can introduce a wobbling or wavy appearance to video footage. This happens with rapid motion or vibrations while recording.
The rolling shutter captures each row of the frame at slightly different times. That means moving objects won’t be in the right place, and straight lines will look bent.
Vertical or diagonal lines may appear slanted. This is obvious when shooting architecture or fast-moving objects with distinct linear features.

To reduce rolling shutter problems in videography:
Opt for a faster shutter speed to reduce the time gap between the capture of the top and bottom rows of the sensor. This can help minimize rolling shutter artifacts. But it does require good lighting or changes to your aperture and ISO settings.
Or a slower shutter speed can help by blurring a moving subject. For example, a fan’s blades might look distorted at 1/1000 s. But they’d become an almost invisible blur at 1/60 s.
Use gimbals, tripods, or Steadicams. This will keep the camera steady and reduce unwanted motion-induced distortions.
When panning, move the camera smoothly and avoid abrupt movements. Slow and controlled panning can help minimize jello effects. A tripod (ideally with a gimbal head) might also help.
Cameras with global shutters might be more suitable for critical video work. But these cameras are often more expensive and can also produce optical illusions.
Global shutters sometimes show moving objects as still or even turning the wrong way. Hence, the blades of a working fan might appear stationary, or the wheels on a car might appear to be going backward.
Some video editing programs and plugins have tools to correct rolling shutter distortions.
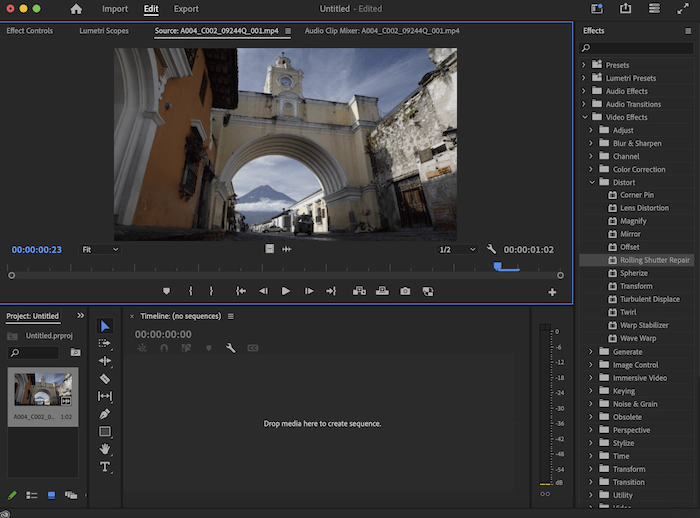
Adobe Premier Pro and Adobe After Effects are two popular examples. The former has a Rolling Shutter Repair effect that can help with the most obvious problems.
In the long run, shutter and sensor technology advances might get rid of rolling shutter for good. In the meantime, it’s important to avoid it in the first place if you can.
Eliminating or reducing rolling shutter in video using software is possible. But it may not completely eliminate the distortion in all cases. Here are steps you can take to reduce it using post-processing software.
Choose video editing software that offers rolling shutter correction tools. These include Adobe Premiere Pro, Final Cut Pro, and DaVinci Resolve.
Import the video clip with rolling shutter distortion into your chosen editing software. Ensure you work with a high-quality, uncompressed file to achieve the best results.
Before applying rolling shutter correction, stabilize the footage if necessary. Use the software’s stabilization tools to remove any more motion-induced artifacts.
Locate and apply the rolling shutter correction effect or tool in your software. The exact method can vary depending on the software. It often involves adjusting parameters such as skew, distortion, or scanlines.

Play with the settings to try and reduce any artifacts while maintaining quality. Be cautious not to overcorrect, as this can introduce other visual issues.
After applying the correction, render or export the video. Choose a high-quality output format to preserve the best possible image quality.
Carefully review the corrected footage to ensure that rolling shutter artifacts are minimized. You may need to fine-tune the correction settings if any distortion remains.
In some cases, frame blending techniques can help reduce rolling shutter artifacts. This involves blending frames to smooth out distortions. But it may slightly affect the overall video quality.
Rolling shutter is an annoying distortion that can easily ruin photos or video. Fortunately, there are ways to avoid it if you know what you’re doing.
You can always use software to get rid of or mitigate the effect in worse-case scenarios. We hope readout speed and shutter design improvements will solve the problem in the long run.
Seeking more great camera tips? Try these posts on the best time to take pictures outside or the use of selective focus in photography next!