Our f-stop chart and article will help you understand the different apertures of a camera lens and the units (f-stops) used to represent them.
The aperture opening is the hole through which light passes into the camera. So its different sizes are important in controlling a photo’s exposure. And these are expressed with f-stop numbers.
This quick-reference infographic illustrates what different-sized apertures look like. And along with their inverse f-stop numbers, it also shows what a full stop, half stop, and third of a stop are.
It also shows the corresponding depth of fields (amount of the image in focus from front to back). And it shows the relative amount of light each aperture setting lets in.
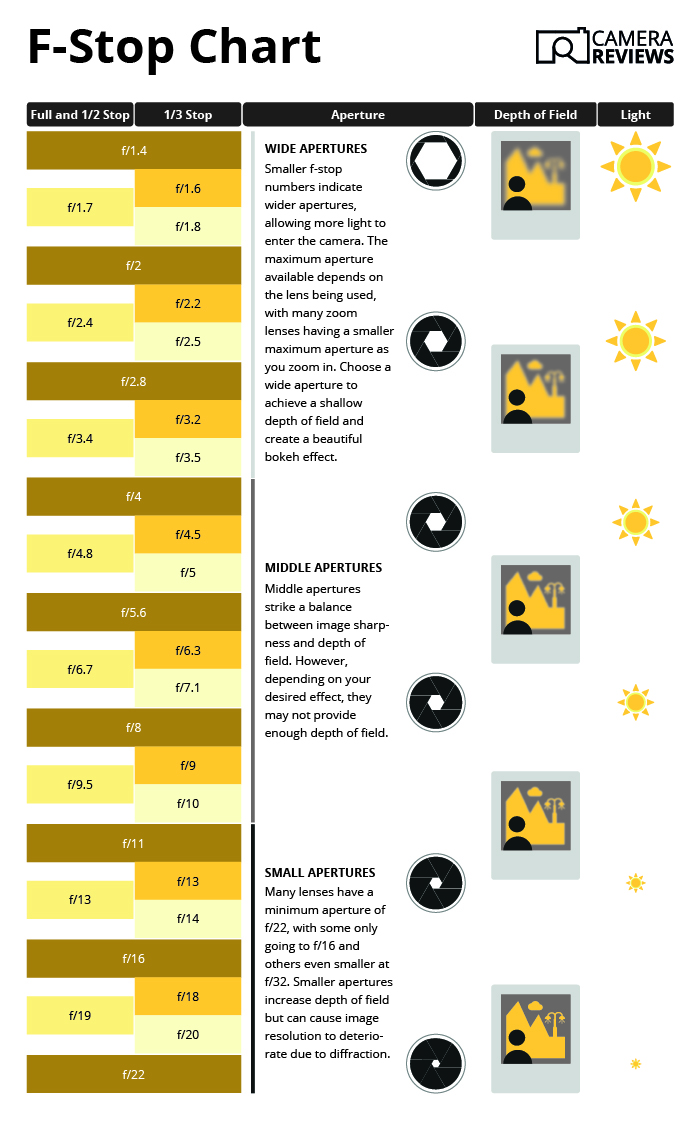
We’ll explain this F-Stop Chart all in more detail throughout the article:
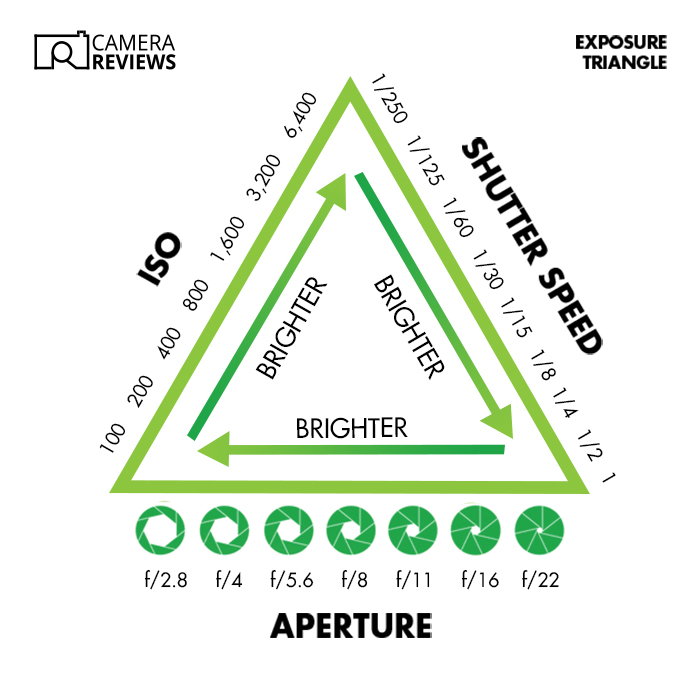
Aperture, shutter speed, and ISO form what’s known as the Exposure Triangle. The shutter speed and ISO units are fairly easy to understand.
But the aperture units are tricky enough to deserve a whole post to explain them! So we’ll first discuss what aperture is. Then we’ll go over what f-stops are in more detail and how they work.
The aperture is the hole in the lens (not the camera) formed by a diaphragm.
The diaphragm is made up of a group of straight or curved metal blades that fit together to form an opening. And the aperture controls open and close these.
If the blades are straight, the aperture will look like a polygon with 7, 9, or 11 sides. And each side is a blade.
If they’re curved, the aperture will look circular. And curved blades create more attractive “bokeh” (or blurred areas) in the background.
The aperture value is also sometimes called the “aperture.” But it’s really an “f-stop.” This is not the same as a “stop,” which is a doubling or halving of the light.
Are you confused yet? Let me explain!
F-stops or f-numbers are the units that measure the size of the aperture. This can be something like f/4 or f/8.
Many think the f-stop is the focal length divided by the aperture diameter. But that’s not quite true.
It’s actually the focal length divided by the “entrance pupil” or “effective aperture.” This is what the aperture opening looks like when you look through the front of the lens.
But the difference is tiny. So it doesn’t really matter!
Think of the f-stop as a fraction. The “f” stands for focal length.
The “/” (backslash) stands for “divided by.”‘ And the number is what you have to divide by to get the diameter of the entrance pupil (or aperture).
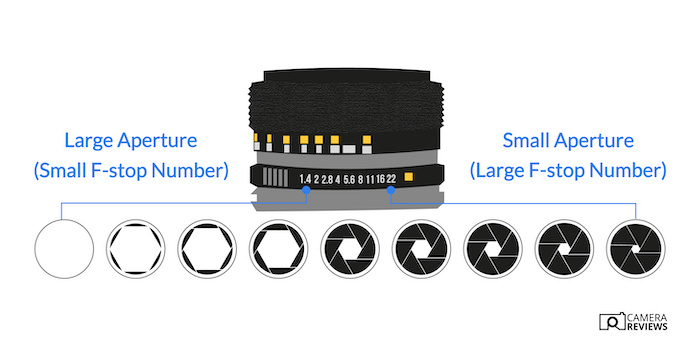
That explains why f/22 is actually smaller (narrower) than f/1.4. You have to divide the focal length by a higher number. So the higher that number, the smaller the aperture.
For instance, if a 400mm lens were set to f/4, the entrance pupil would be 100mm across (400 ÷ 4). But if you choose f/8, the entrance pupil would only be 50mm across (400 ÷ 8).
The f/4 aperture is twice the diameter (100mm vs 50mm). So it lets in four times as much light as f/8. So this is two “stops” (or doublings).
Different lenses have different ranges of possible aperture settings. They go from f/1 up to f/32 (shown on the lens as a ratio like 1:32).
The lower the number, the larger (wider) the hole. And this means more light passes through to the film or camera sensor. This is handy in low light.
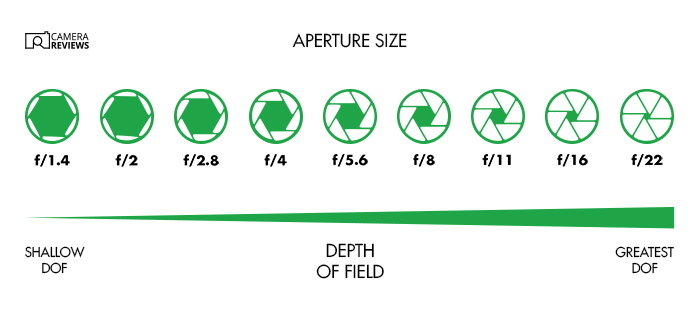
And the other advantage of a wide aperture with certain types of photography is the shallow depth of field. This is the region in the photo, from front to back, that is “acceptably sharp.”
Portrait and wildlife photographers want to separate subjects from the background. So they need fast lenses (large or wide apertures and small f-stop numbers).
These are generally prime lenses with a fixed focal length. And they can cost thousands of dollars.
Because of how the aperture is calculated, long lenses are harder to make with a wide maximum aperture.
Wide-angle and portrait lenses (around 85mm long) might let you shoot at f/1.4 or f/1.8. But a top-of-the-line 400mm lens might only have a maximum aperture of f/2.8.
The typical range of f-stops used in photography is f/1, f/1.4, f/2, f/2.8, f/4, f/5.6, f/8, f/11, f/16, f/22, f/32.
You halve the amount of light getting in as you go from each full stop to the next (small to larger f-stop numbers). So any images will be half as bright (all other things being equal).
You might notice that each number is simply the number before multiplied by roughly 1.4. In fact, several numbers are rounded to make them easier to remember.
And the true multiplier is the square root of two. (1.414… with a few more decimal places!)
The reason why f-stops don’t progress in a smooth sequence? The amount of light the aperture lets in isn’t proportional to its diameter but to its area.
Imagine you were drawing squares on a piece of paper. A square measuring one inch on all sides would be one square inch.
If you wanted to double the area, you couldn’t just double the length of the sides. That would give you a square with an area of 2 x 2 or four square inches.
Instead, multiply the sides by—you guessed it—the square root of two (or 1.414…).
A square with sides of approximately 1.414 inches would have an area of 1.414. x 1.414. Rounded up, this is two square inches.
If you understand the math, you understand why doubling the f-number means taking away two stops. For example, let’s say we’re going from f/8 to f/16.
This means dividing the length by twice as much to get the new aperture and halving the diameter. This means it’s only a quarter of the old area or two full stops smaller.
Most modern mirrorless cameras and DSLRs have aperture scales measured in thirds (1/3) of a stop. But you can usually change them to full or half (1/2) stops if you want to.
This makes the math even more complicated! But our f-stop chart shows the full aperture scale with full stops, half stops, and thirds of a stop in an easy manner.
No photographer memorizes the whole scale. So you don’t need to worry about it. All you need to know is the number of “clicks” on the aperture dial between the two settings.
You should feel three clicks if you want to open the aperture by one full stop. You should only feel one or two clicks if you only need a third (1/3) or two-thirds (2/3) of a stop.
Just make sure you’re turning it the right way!
Once you’ve understood f-stops, you’re ready to start using them! The aperture is one way of adjusting the exposure of an image. But it also helps to control the depth of field.
You need the right exposure mode to change the aperture on most modern cameras.
Exposure modes let you choose between convenience and control. If you choose Auto, Program, or one of the Scene modes, the camera will select all the exposure settings for you.
But that might not work well if you’re shooting in difficult lighting conditions or trying for an “arty” effect!
If you want to control the aperture directly, you must be in Aperture Priority or Manual mode:
But many photographers use Auto ISO to avoid worrying about exposure. The camera will simply pick the correct ISO to suit the lighting conditions.
Aperture controls vary by manufacturer and camera model. But most cameras have a dial at the front of the body that you can turn to select the f-stop.
You should ask yourself what you’re trying to do to decide which one to choose. Do you want to change the exposure or the depth of field?
If you want to brighten or darken the image, you must be in Manual mode with the Auto ISO switched off. Otherwise, the camera will compensate by changing the shutter speed or the ISO.
Narrowing your aperture by a stop (like f/5.6 to f/8) will halve the brightness. Widening your aperture by a stop (like f/8 to f/5.6) will double it.
If you want to change the depth of field, you need to be in Aperture Priority or Manual mode. The larger the f-number, the larger the depth of field.
But it also depends on the lens focal length and your distance from the subject. The longer the camera lens and the closer you are, the shallower the depth of field.
If you want to check the depth of field on a DSLR, use the Depth of Field (DOF) preview button if there is one. Or take a few test shots.
On a mirrorless camera, you should see it immediately in the “what you see is what you get” (WYSIWYG) electronic viewfinder (EVF) or rear LCD.
Or you can get apps like Set My Camera to calculate the exact depth of field figures. You just have to enter your camera, focal length, aperture, and distance from your subject.
If you reach the widest or narrowest aperture, you can always use exposure compensation to change the exposure. Just ensure you’re in Aperture Priority or Manual mode with Auto ISO first.
All cameras are programmed to think that the world reflects 18% of the light that falls on it. They don’t always get it right. But they try to hit that figure.
Cameras adjust the aperture, shutter speed, and ISO accordingly. If you add exposure compensation, the camera will try to brighten or darken the image.
Some cameras even have a dedicated dial, usually measured in stops from -3 to +3.
One or two stops of positive exposure compensation are usually enough to brighten your image. One or two stops of negative exposure compensation are usually enough to darken it.
We hope our article and the f-stop chart have shown you all you need to know about the aperture of a lens.
The odd sequence of f-stop numbers can be confusing at first. But there’s some fairly simple math behind it. If you understand that, the numbers make a lot more sense!
Getting familiar with the standard sequence of f-stops is handy for any photographer. But the numbers themselves are less important than the effect of changing the aperture.
The aperture controls the exposure (if you’re in full Manual mode) and the depth of field in your images.
If you can use different f-stops to help get the correct exposure and depth of field, you will be well on your way to becoming a good photographer.

These are answers to the most frequently asked questions we get about f-stops and the f-stop chart.
The f-stops are a sequence of numbers that double or halve the light that enters the lens. The sequence of f-stops usually goes something like this—f/1.4, f/2, f/2.8, f/4, f/5.6, f/8, f/11, f/16, f/22, f/32, f/64…
The aperture values are always the same numbers in the same order. But there is no “standard” f-stop range. It all depends on the lens.
Some lenses are “fast,” which means they have wide maximum apertures that let in a lot of light, like f/2.8. Others might have a limit of f/5.6.
Plus, the narrowest (smallest) aperture also varies. It is usually between f/22 and f/32.
The difference between f/2.8 and f/4 is one full stop. Going from f/2.8 to f/4 halves the light that enters the lens. Going from f/4 to f/2.8 doubles the light that enters the lens.
It depends. Photographers choose different f-stops for different purposes.
A lower f-stop, like f/1.4 or f/2, allows more light into the lens. This can help in low light and create a shallow depth of field with a blurred background. This might be good for portraits.
A higher f-stop, like f/16 or f/22, reduces the light entering the lens. But it can increase the depth of field and create a sharper image overall. This might be good for landscapes.
The f-stop or aperture value doesn’t directly affect the image quality. But every lens has a “sweet spot.” This is the f-stop that allows it to create the sharpest pictures.
This is usually two or three stops from the maximum aperture. But some high-end lenses are sharpest when shooting wide open.
Wide apertures may lead to spherical aberration, and narrow apertures may lead to diffraction. Either way, you may get increasing softness or distortion as you move away from the sweet spot.
Yes, f/2.8 is a good aperture setting for low-light situations. The wider aperture lets more light enter the lens.
This makes getting a properly exposed image easier when it’s getting dark. Or it makes exposure easier if you’re shooting indoors.
But wide-angle lenses usually have wider maximum apertures than telephoto lenses. So you might be able to shoot at f/1.4 or f/2.
Check out our posts on shooting photos in fog or best podcasting cameras next!