I picked up my lovely Canon EOS 5D Mark III DSLR camera and counted camera parts names. There are 35 different buttons I can press or actions I can take without lifting my hands off the camera.
That’s not including using some of those to open up the menus of several hundred items. It can be very confusing if you’re fairly new to photography. From experience, all of us here at CameraReviews say that learning is the key.
Perhaps you want to learn more about how your camera works. Understanding the controls helps you to get the most from the camera settings. The more you understand the parts of a camera, the better your photography will be!
So, this is a guide to the parts of a camera… what we call them and what they do. And I’ll try to do it in that order. But knowing what they do is more important than knowing their names.
I’m going to focus on digital cameras instead of film cameras. Film cameras are great, but most photographers use modern cameras these days. Photographers usually use mirrorless or DSLR cameras. (DSLR stands for Digital Single Lens Reflex.)
I broke this article down into three sections.
So, let’s dive into the parts of a camera common to every camera.
It is, to paraphrase Dickens, the simplest of things and the most complex of things… the names of the parts of a camera.
At its simplest, a camera has film, a hole to let light in, and a way of stopping that light. For digital cameras, we call that a sensor, an aperture, and a shutter.
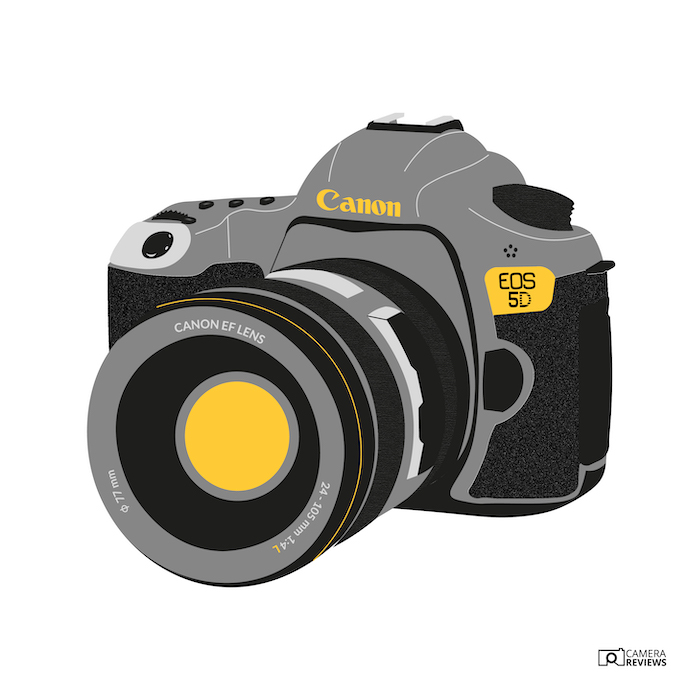
We’ll illustrate this article with my DSLR camera as an example. We start with the main parts of a camera.
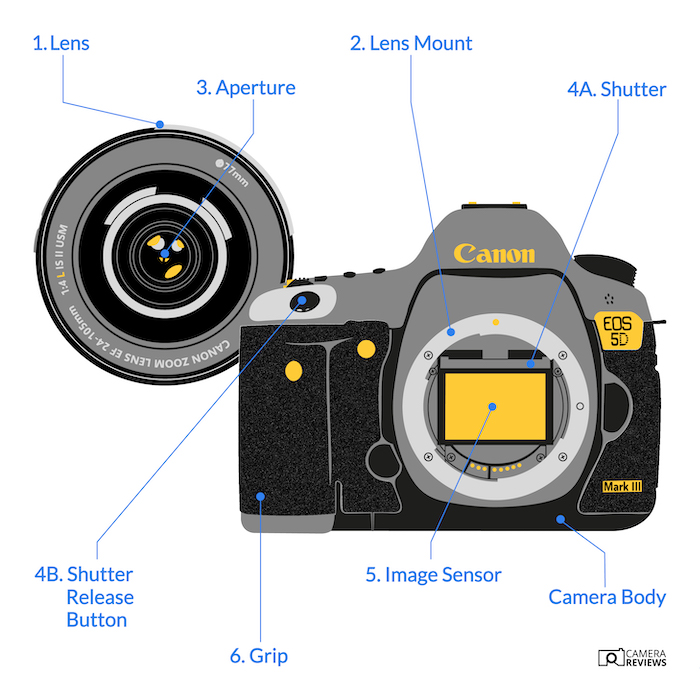
We use a camera lens to allow light into the camera body. And it focuses that light on the sensor.
The attachable lens on an interchangeable DSLR or mirrorless camera is a fixed “prime lens” or a zoom. Lens “lengths” are given in millimeters (mm). In a compact camera, the zoom lens will be part of the whole camera.
The bigger the number, the more the telephoto effect. It gets complicated, depending on the sensor size. But full frame camera lenses over about 100 mm are considered telephoto lenses. Below 50 mm, they are considered wide-angle lenses.
Cameras with detachable lenses use a “lens mount.” This is how the lens connects to the camera body. The main camera manufacturers like Nikon and Canon have their own mounts. Some camera types, like Micro Four Thirds cameras, share a mount among several brands.
The lens mount might only be the way of locking the lens to the body. Usually, it contains many electrical connections. That way, the camera and the lens can communicate.
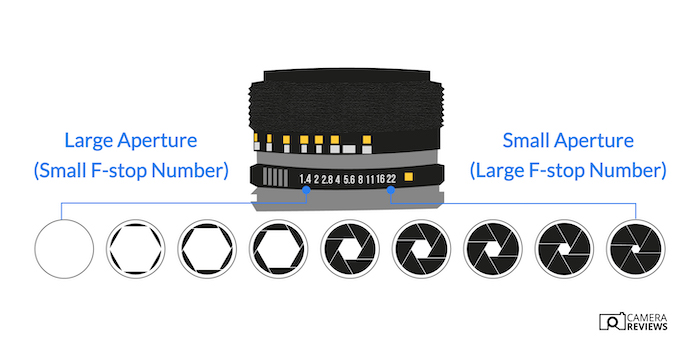
Most lenses work in the same way as our eyes. Your eye’s iris adjusts the size of its “aperture” according to how bright it is. We even borrow the word “iris” to describe the lens mechanism that adjusts the hole size. It is an “iris diaphragm.”
We describe the aperture as an “f-number.” So, my current DSLR camera lens has a maximum aperture of f/4. That’s as big as the hole will go. A large aperture means a small f-stop number like f/1.4. A small aperture means a large number like f/22.
The shutter controls the time light is allowed to strike the image sensor. In the days of old full plate cameras, these times could be many seconds. Sometimes it was even minutes. Today, we control it with a shutter release button.
Shutters can be a leaf or focal plane. They can be curtains or blades. And they can move vertically or horizontally. All of these options have pros and cons. But it’s too complex for this article.
Today, the best digital cameras regularly have a maximum shutter speed of 1/8,000 s. According to my calculator, that’s 0.000125 s. This sort of shutter speed shows us what the naked eye can’t. The Canon EOS R3 DSLR camera has a ludicrous 1/64,000 s maximum speed.
The important thing for us to note here is that every sensor is sensitive to a range of light levels. With film, we used to talk about ASA and DIN numbers. The legendary Ilford FP4 black and white film was 125 ASA 22 DIN. Helpfully, ASA numbers are the same value as the ISO numbers we use now.
Image sensor sensitivity has improved along with everything else. It is not uncommon to see ISO ratings of 25,600. Sometimes they’re even higher. Higher sensitivity often comes with a loss of picture detail. So these numbers are often misleading or of no use.
The bigger the camera, the more helpful it is to have a secure grip on it. This is usually for the fingers of your right hand to clasp. Some may not have one.
Big professional cameras like the Canon EOS R3 have a second grip. You can use them to hold the camera in portrait orientation. You can fit some DSLR cameras (mine included) with a “battery grip” for this vertical shooting format.
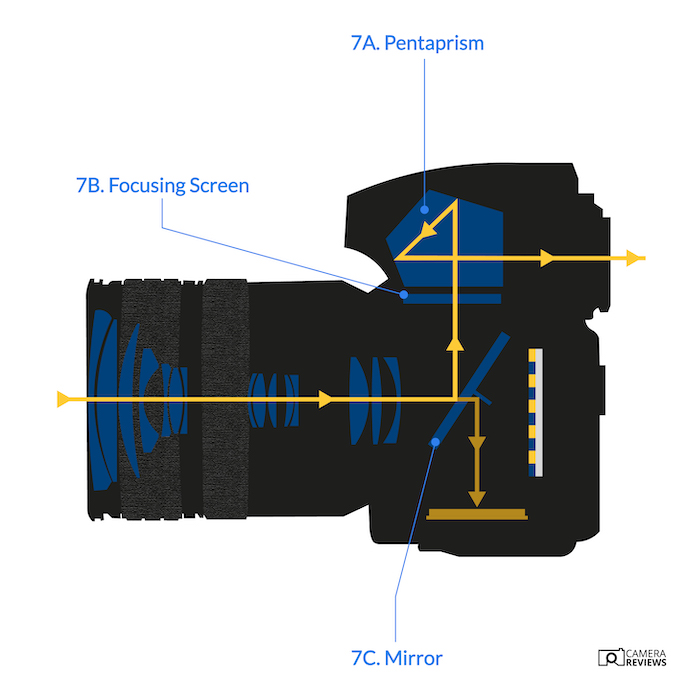
These make DSLR cameras unique. (Well, film SLRs also.) The light comes through the lens and reflects off the mirror (7C). It hits the focusing screen (7C). This is placed exactly the same distance from the lens as the sensor.
So if it is in focus on the screen, it is in focus on the camera sensor. The pentaprism (7A) shuttles the image. It goes from the horizontal screen out to the back of the vertical viewfinder so you can see it.
When you’re happy, you press the shutter release button. The mirror flips up, the aperture closes, and the shutter opens and closes. You have taken the picture! The mirror returns to its previous position.
A mirror, of course, is not found in mirrorless digital cameras.
These parts are found on most cameras.
A viewfinder lets you see what should be in the picture. In the old days of compact film cameras? It was an arrangement of lenses at the top of the camera that you looked through. And it gave a good enough idea of what we would include in the shot.
The best viewfinder solution in the business comes with the DSLR. With DSLR cameras, you look through the actual lens that takes the photo. One consequence of the design? The image briefly disappears when you press the shutter release button.
Cheaper compact digital cameras often forgo the viewfinder entirely. It takes up space. And the LCD screen on the back of the camera body shows you exactly (pretty much) what will be in the picture. And it shows you exactly what is in the picture as soon as you take it.
Even some pretty expensive mirrorless cameras don’t have viewfinders. The makers use that space for a smaller camera body or a bigger LCD screen. A viewfinder on a mirrorless camera is only another screen, anyway. So in many ways, it makes sense not to have one. Bright sunlight or if you need to keep the camera steady are some reasons for wanting a viewfinder.
With an optical viewfinder, lenses (and sometimes mirrors) show you what is in the frame. You use an electronic viewfinder the same way as an optical one. You look through a lens.
An electronic viewfinder is a mini LED screen. Lenses magnify it. So it feels like you’re looking through a normal viewfinder.
An electronic viewfinder can often display more information to the photographer. But if you’re used to an optical one, electronic might seem jerky or slightly delayed.
A student once told me that no decent photographer would look at their viewing screen during a shoot. He was wrong. The LCD (or LED) screen allows you to ensure that the shots turn out as you want.
It’s not perfect, and stuff that looks good on a 3-inch LCD might look poor on your 27-inch iMac. But it certainly helps.
Increasingly, these screens are touchscreens. You can use them for focus selection, menus, and other functions. Many mirrorless cameras and cheap compact cameras have no separate viewfinder. So the LCD screen is all you have.
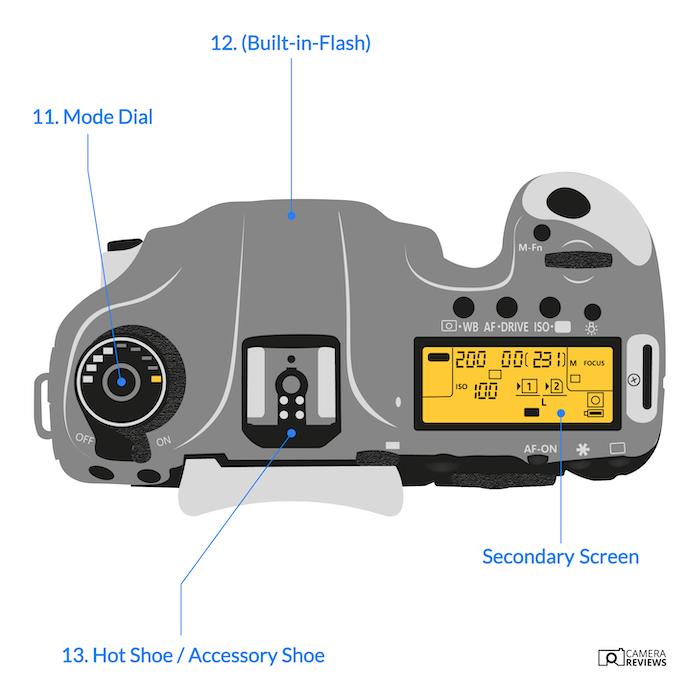
Some cameras have a secondary viewing screen on top of the camera. They often show camera controls.
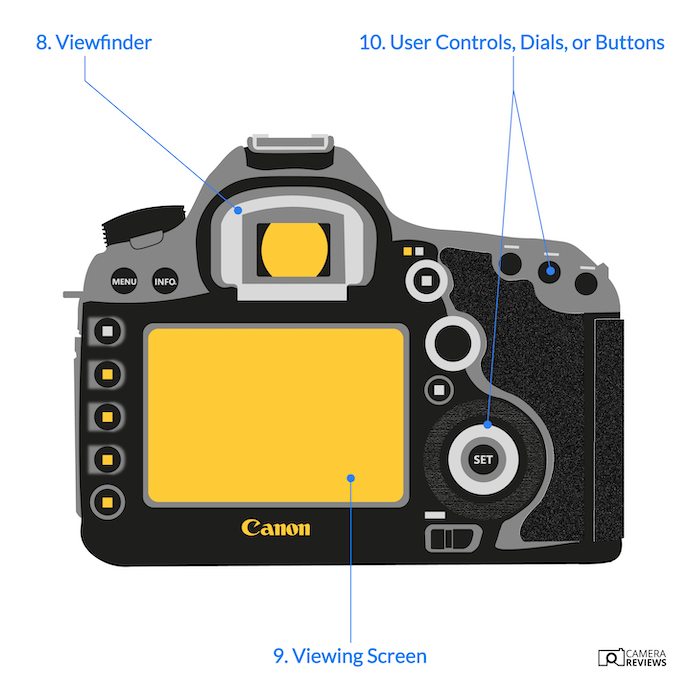
There will be one or many of these. Some will be dials. Some might be joysticks. On some newer, high-end Canon cameras, they are touch-sensitive buttons. You can control them by sliding your finger across them.
Playback controls let you see what you’ve captured (see “screen” above). Plus, most cameras these days have video recording capability. So there’s a switch or button that tells the camera to record.
A magnifying button helps you check that you have important things in focus. And many good quality cameras let you assign custom functions to some or many buttons… You can go back to the manual to find out the possibilities.
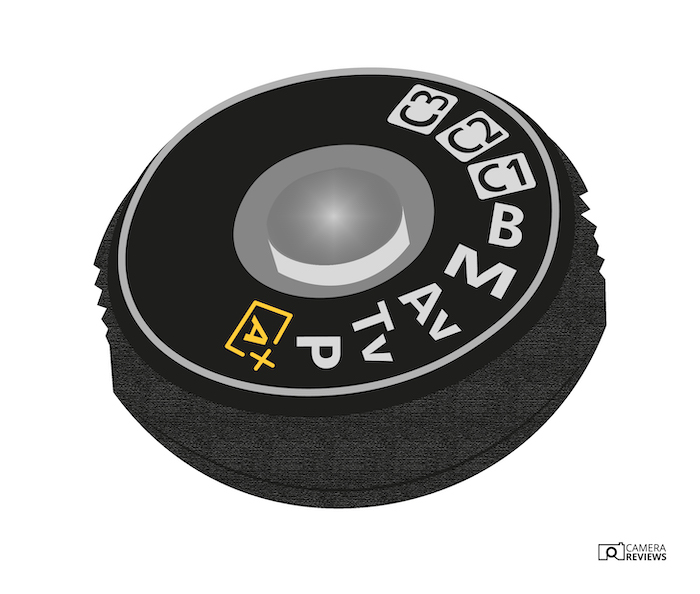
Even the most basic digital camera is likely to have a mode dial. It is here you select if you want to shoot video or stills.
You also might have choices of fully automatic (A) or varying degrees of manual control. These include “aperture priority” and “shutter priority.”
There might be settings for sports, portraits, or parties. Sometimes the mode dial will combine other functions too.
You won’t find this on professional cameras (we indicate where it would be). But below that level, a built-in flash helps you get a picture when it would otherwise be too dark. The camera’s “brain” takes care of exposure. This is because most human brains can’t calculate flash exposures. Trust me!
This is for external flash guns or other accessories. It’s “hot” because it has electrical connections. This allows communication between the camera body and the external flash.
Some action cameras have a “cold shoe.” It’s the same fitting, but with no electrical connections.
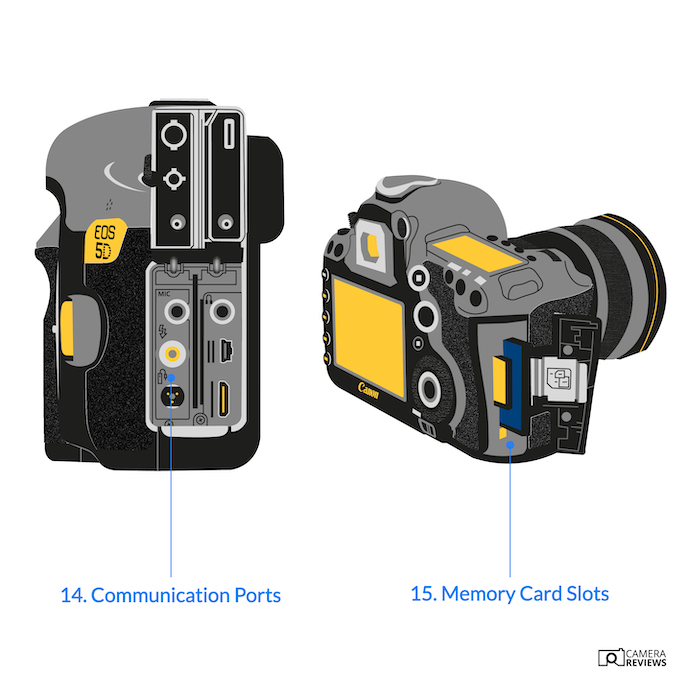
You can always remove your memory card to transfer your photos. But most cameras will have one or more ways of connecting a cable. Typically this is USB, often HDMI. Sometimes, it is even high-speed Gigabit Ethernet.
Better cameras have inputs for external microphones and outputs for headphones. This is because you won’t capture good sound from an internal microphone—no question.
These sockets allow you to attach external mics. And you can check the recording with headphones.
You store your photos on some form of flash memory card. Pro-level cameras usually have two card slots. How quickly you can record bursts of photos depends on the speed of the card and the card slot.
Your camera needs power. This most likely comes from a rechargeable battery. Sometimes from AA or AAA batteries. An external charger is also helpful if you take many photos and might need a second battery.
Charging your battery and powering your camera via a USB cable might be possible. This is increasingly common and very useful.
You can fit an optional battery grip on high-level DSLRs and mirrorless cameras. This usually doubles the battery power.
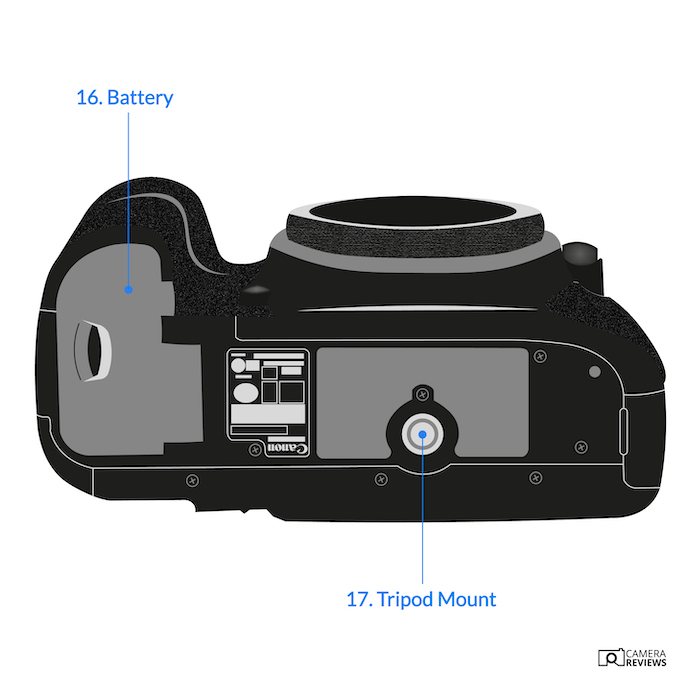
This is a threaded socket on the camera’s base to fix it to a tripod. Most tripods these days have a “quick-release” plate. It connects to the camera and then fixes to the tripod. It speeds up the process.
These are some of the more advanced photography controls.
Sometimes the camera’s autofocus system won’t work. Or you need to focus carefully on a particular point. The AF switch lets you go into manual focus mode. This is where the LCD screen and magnification can help get the focus perfect.
You can tell the camera to take an exposure reading or fix the focus on a point. Then you can make it keep that while you reframe and take the photo. It’s very useful in difficult exposure situations. (This is the AE lock button on a Canon.)
There will be times when you want to tell the camera where to focus. Very often, with fancy-pants face- and eye-tracking focus, the camera takes care of this. At other times, you want to control it. (This is the AF Point Selection button on a Canon.)
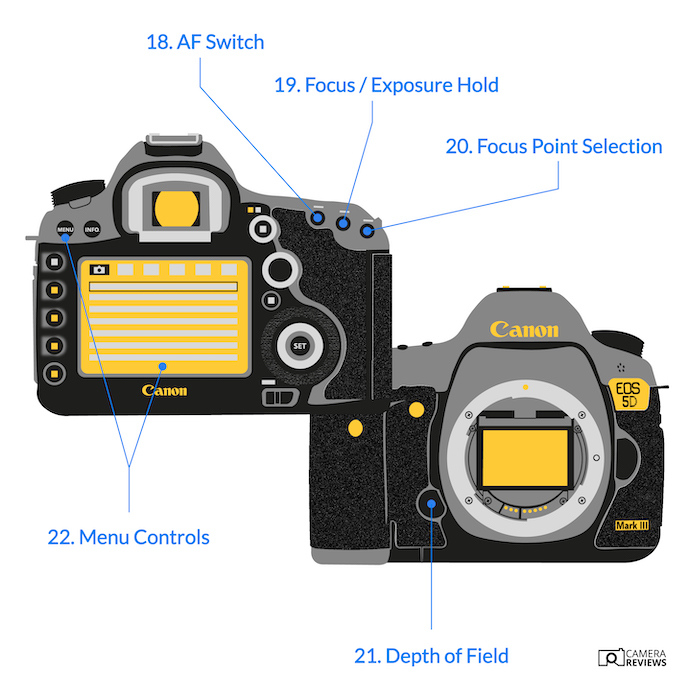
Understanding “depth of field” is central to improving your photography. I have an old film SLR that was fancy in its day. It had through-the-lens (TTL) metering.
But in those days, the meter only worked if the lens aperture was at the setting for the photo. The good thing about this? You could see the depth of field. The bad news was that the viewfinder image could be quite dark.
Now TTL works with lenses wide open. But you need to use the depth of field preview to see the effect of the chosen aperture.
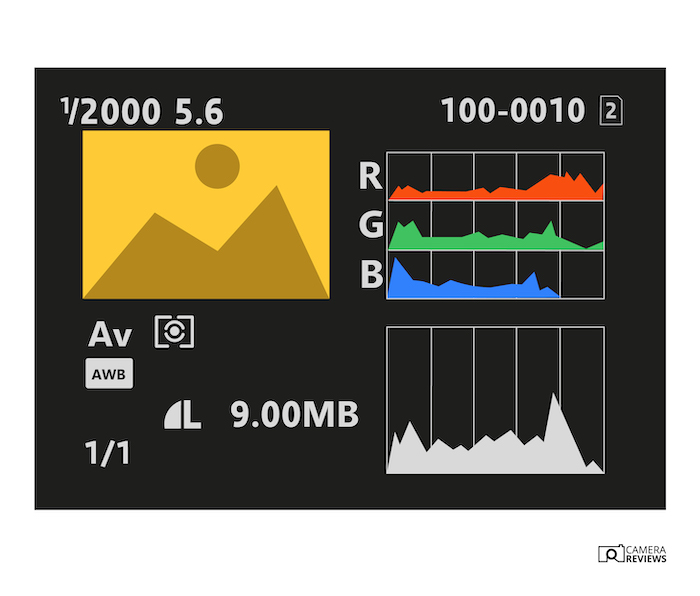
Almost every camera these days have some menus for you to navigate. I highly recommend going beyond the “quick start” options and diving into all the features.
For instance, turn on the histogram feature if it is available and you’re super-cautious. This will tell you if you’ve lost any detail through over-exposed highlights.
I hope I’ve set out the essential camera parts names… for the simplest digital camera to the most complex DSLR. They often say that the best camera is the one you have with you. I think the best advice is to get to know how your camera works to get the best out of it!
If you want to continue your research, try our articles explaining Canon camera names or best camera settings for sunset photos next!