Are you striving for perfect sunset photos? You can transform your images of the golden hour by using editing software like Lightroom. But selecting the best camera settings for sunset photography in-camera is always a good idea.
That way, you don’t need to do as much work in post-production. And you can also create effects when shooting sunsets that aren’t possible otherwise.
Sunsets don’t last very long. So you must prepare in advance to decide what kind of sunset photography you like and how to get it. We’ll first go over some photography equipment you may need. Then we’ll dive into camera settings for sunset photos.
Before you plan a sunset photography shoot, you must ensure you have all the tools of the trade. Our guide will mention accessories such as tripods and filters. But it will focus on the right camera settings to capture great sunset shots.
You can take sunset photos with any camera—even a smartphone! But it helps if you have a DSLR or mirrorless camera. These have a high dynamic range that lets you capture all the shadows and highlights in a typical sunset.
A tripod is handy for sunset photos because of the low light levels. Use a low ISO and a narrow aperture (high f-stop number) for the highest image quality and front-to-back sharpness.
That means the shutter speed has to be slow enough to compensate—perhaps too slow to shoot handheld. If you have a tripod, you don’t have to worry about camera shake. You can focus on the composition.
The only exception is when there are moving subjects, such as trees, water, clouds, people, or animals. These need a higher shutter speed to freeze the action. (Unless you want to introduce motion blur using a slow shutter speed.)
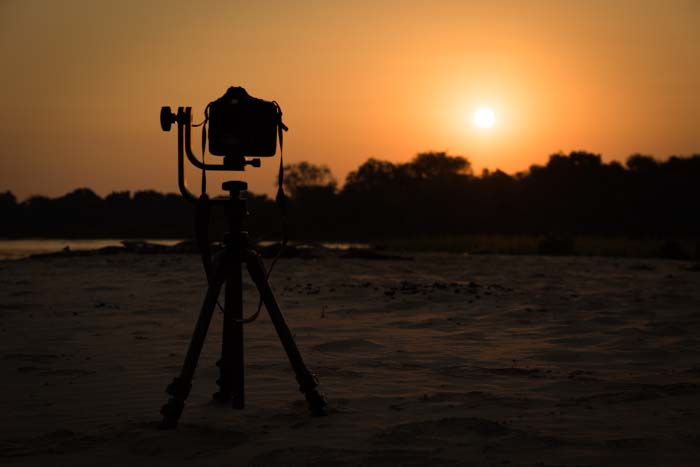
You need a remote release to make the best use of a tripod. This might attach to the camera by cable or work remotely using Bluetooth.
You can always use the self-timer if necessary. But it does mean you have to choose when to take your shots a few seconds in advance. That’s fine for a static landscape. But it won’t work so well for a moving subject!
Neutral density (ND) filters can also be handy. There are times of the day when there is too much light to use the exposure values you want. An ND filter lets you increase the shutter speed or widen the aperture while keeping the exposure constant.
There are two kinds—regular and graduated. The regular ones have the same density throughout.
But the graduated ones can be useful because they only block light from entering half the frame. This is handy for toning down a bright sky while preserving detail in a dark foreground.
What makes a good sunset photo? Well, it’s mainly a matter of taste. So there are no hard and fast rules for the exact exposure settings.
But the right camera settings for the exposure mode, aperture, shutter speed, ISO, and autofocus will give you a good starting point. After that, you can experiment all you like!
For maximum image quality and post-processing flexibility, you should always shoot in RAW. RAW files contain the maximum amount of image data. That means you can recover more detail from shadows and highlights.
Another benefit is that you can always change the white balance in post-processing. And it doesn’t affect the image quality.
JPEG files are compressed, which means you lose detail. And you are more likely to get banding in the sky rather than subtle color gradations.
They also limit your white balance options to As Shot, Auto, and Custom. And those aren’t very useful!
The white balance setting tells the camera what color the light is. If you start with Daylight or Auto, it can’t go too far wrong. But some cameras have an Auto setting that keeps the warm colors you get at sunset.
If you want to “cheat” and make all the colors warmer, you can always switch to Cloudy or Shade. This can either be done in-camera or when you edit your pictures.
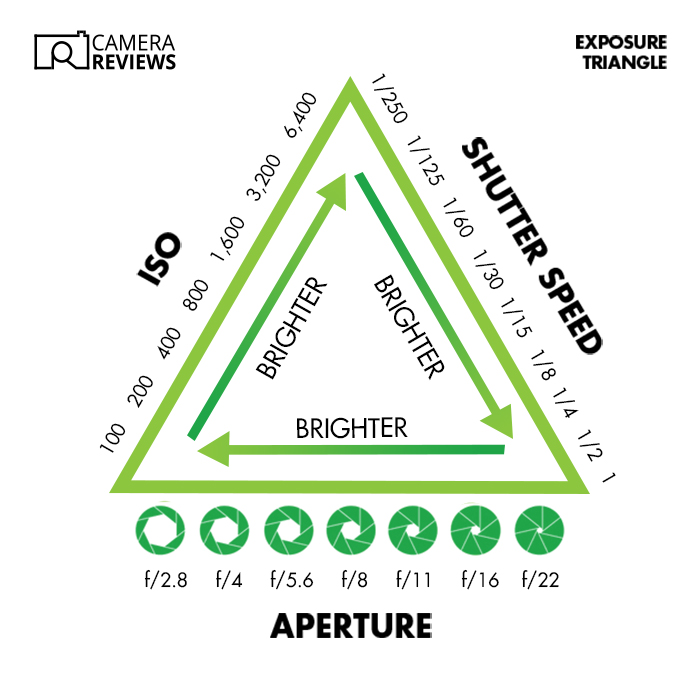
The exposure mode establishes how much control the photographer has over the aperture, shutter speed, and ISO. If you switch to Auto ISO, the camera ensures the exposure is correct even if you choose the other settings.
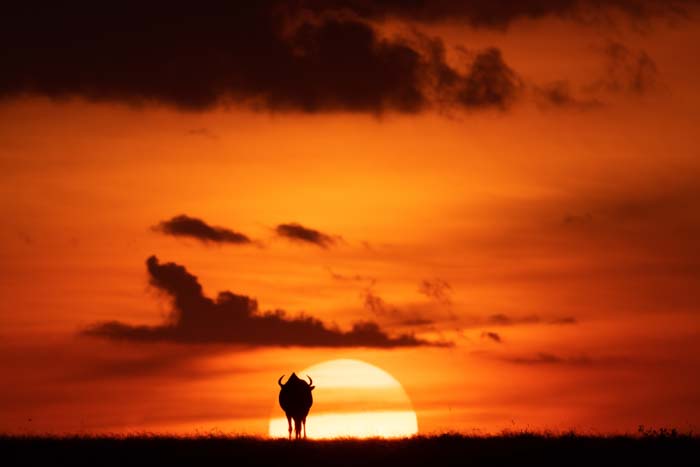
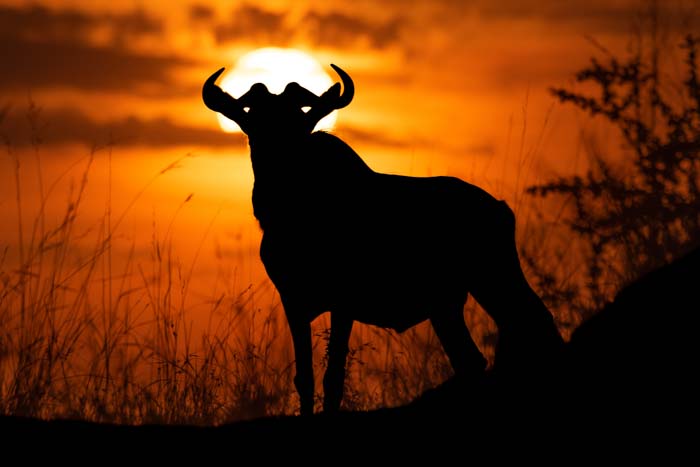
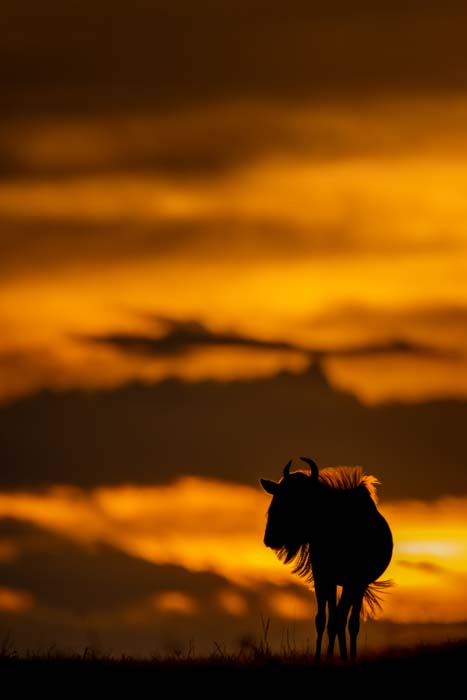
Sunset photos can have any subject. It can be anything from a beach volleyball game to a wildebeest silhouetted on the horizon.
The best exposure mode depends on how much movement there is in the scene and whether you want to keep everything sharp or not.
The classic landscape photography approach uses the Aperture Priority mode. You set the ISO to the base level (around 100 ISO) and the aperture to f/16. Then the camera decides the shutter speed.
It works well for static subjects. But if there’s any movement, you must watch your shutter speed as it gets dark. You might not mind a bit of motion blur for clouds or water. But it wouldn’t necessarily work for people or animals!
If keeping your subject sharp is more important than working at base ISO, you can still work in Aperture Priority mode. But you’ll have to bump up your shutter speed by setting a higher ISO.
I customize the control wheel on my Sony a1. So I can turn it to choose the right ISO and, thus, the right shutter speed.
An alternative approach is to use Manual mode with Auto ISO. This is the default setting for my wildlife photography camera. It means I keep control over the aperture and the shutter speed.
Yes, I won’t always get the lowest possible ISO. But it’s worth it if the animal remains sharp!
The default aperture setting for landscape photography is around f/10 to f/16. Many entry-level and mid-range lenses are at their sharpest in this aperture range.
This hits the “sweet spot.” It’s narrow enough to keep everything sharp in the frame from front to back. But it’s not so narrow that it introduces softness from diffraction.
But it’s important to remember that sunset photography cuts across traditional genres. Again, it all depends on your subject.
If you’re taking pictures of someone on a beach throwing stones into the sea, that’s not landscape photography! So you might want a wider aperture to separate your subject from the background.
The good news is that Aperture Priority lets you keep control of the aperture. So you can play around with it as much as you like. All you need to do is watch your shutter speed to ensure your subject remains sharp.
If you’re taking sunset photos using a tripod of a static subject, the shutter speed doesn’t really matter. That’s why Aperture Priority works so well for landscape photographers.
They can set their ISO to the base value and set a narrow aperture like f/16. And then, they let the camera decide the shutter speed.
But everything changes if there’s movement. It might be trees dancing in the wind, clouds blowing across the sky, or the tide going in and out. Whatever it is, you must decide whether to keep everything sharp or accept some motion blur.

Motion blur works well with clouds and water. But you have to get the shutter speed right. It depends on the local conditions.
The clouds might be moving pretty fast if it’s blowing a gale. That means you can get away with a shutter speed of a second or two.
The same applies to water. If you want a classic “creamy” waterfall shot, you don’t want your shutter speed to be any faster than 1/4 of a second.
As with all these camera settings for sunset photography, it’s a matter of personal taste. So it’s important to experiment. Take a few test shots with different shutter speeds and see what works.
Photographers use the minimum ISO to get the best dynamic range, color rendition, sharpness, and contrast. And it keeps noise to a minimum.
On most cameras, the base ISO is 100. But it’s 64 for most Nikon DSLRs. Many cameras now have an “extended” ISO range that goes down to 50 or even 32 ISO. But you shouldn’t use these values because they affect image quality.
Some models have two base ISOs. The Sony a1, for example, uses 100 and 500 ISO. This is useful if you need to boost the ISO to get a higher shutter speed. If you use ISO 500 rather than 100 ISO, there will be less impact on the image quality.
Traditionally, landscape photographers use wide-angle lenses to capture a wide field of view. It usually involves foreground interest, the main subject, and a background of clouds or mountains.
This is a good starting point for sunset photos. But it’s totally up to you.
Unless you’re in the wilderness, finding a scene without artificial distractions is often hard. This means a longer focal length might be better for zooming in on a particular detail, like a lone tree, person, or animal.
Of course, zooms are handy for changing the focal length. But you still might have to change lenses—unless you’re lucky enough to own two camera bodies.
The important thing is to be careful to stop foreign bodies from entering your camera. At an aperture of f/16, any sensor spots will be visible in your shots.
The brightness and color of the sky change rapidly at sundown. This is especially true near the equator, where the sun sets fastest. That means you might need to use bracketing.
This function lets you take three, five, seven, or nine shots at different exposures. You can usually choose the number of frames, the exposure gap, and whether the camera changes the shutter speed or aperture.
I suggest starting with three frames. Begin with one at the correct exposure, one a stop darker, and one a stop brighter, changing the shutter speed each time.
If you want the “perfect” exposure, you can add more frames and shorten the gaps between them.
If you want to capture as much detail as possible in the shadows and highlights, you might want to experiment with High Dynamic Range (HDR). This is a way of combining bracketed images at different exposures.
Some cameras can do this all by themselves. But you can always combine the images later in Adobe Lightroom or Adobe Photoshop. You just have to ensure you use a tripod when taking the pictures, so they all line up exactly!
Modern camera AF systems are very capable—especially on mirrorless cameras. But they do tend to struggle in low light. (Read our article on the best low-light Nikon cameras.)
That’s when a camera’s manual focus comes in. After autofocusing on your subject, you can manually switch and fine-tune the focus point. You can even zoom in using Live View or focus magnification to check what’s sharp and what’s not.
Another time you might use manual focus is if you use the “hyperfocal distance.” This distance ensures everything from the minimum focus distance to infinity is “acceptably sharp.”
A rough proxy focuses on a point a third into the scene. But apps such as Set My Camera can tell exactly the hyperfocal distance.
All you have to do is enter your camera, focal length, and aperture. Once you know that, dialing it in manually is sometimes easier than using autofocus. This is especially true if your lens has a handy distance scale.
If you’re using Aperture Priority, an easy way to tinker with the brightness is to use exposure compensation. You can usually add or subtract three to five stops like this. And it’s easy to do on the fly if your camera has a dedicated dial.
Adding positive exposure compensation makes your pictures brighter. Adding negative exposure compensation makes them darker.
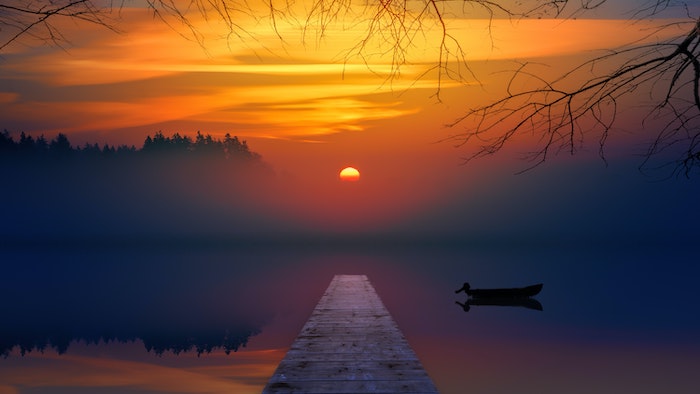
Underexposing sunset photos does three things. It creates silhouettes, adds saturation to the colors, and shifts the hues from yellow to orange to red. This is a matter of personal preference, though. So you have to try it out for yourself!

Everybody loves a good sunset photo. So this is your chance to impress your friends, relatives, and anyone else who sees your images.
Get into the habit of shooting sunsets in Aperture Priority mode at f/16 and 100 ISO. And you should get great results with static subjects. Just be ready to boost the ISO or switch to Manual mode with Auto ISO if you need a higher shutter speed to freeze any action.
I hope this article has helped you get a handle on the basic equipment and best camera settings for sunset photography. Knowing the right starting point allows you to experiment to your heart’s content!
If you’re on the hunt for more great tips, try our posts on basic camera parts names and functions, or what to look for when buying a camera next!